Python Tkinter Digital Clock

How to Create Digital Clock In Python Tkinter

Digital Clock In Python Tkinter


In this Python tutorial we will create a digital clock using the Tkinter library for the graphical user interface. 
It continuously updates every second to display the current time in hours, minutes, and seconds.

What We Are Gonna Use In This Project:

- Python Programming Language.
- Tkinter for GUI.
- VS Code Editor.


Project Source Code:


import tkinter as tk
from time import strftime

def time():
# Get the current time in the specified format
string = strftime("%H:%M:%S %p")

# Update the label text with the current time
lbl.config(text = string)

# Schedule the time function to be called after 1000 milliseconds (1 second)
lbl.after(1000, time)


# Create the main Tkinter window
root = tk.Tk()
root.title("Digital Clock")

# Create a label for displaying the digital clock
lbl = tk.Label(root, font=('Helvatica', 40, 'bold'), background="#2f3640",
foreground="#fbc531")

# Pack the label to the center of the window
lbl.pack(anchor = 'center')

# Call the time function to start updating the clock
time()

root.mainloop()


The Final Result:

Python Tkinter Digital Clock


Java Animated Chart

How to Create an Animated Chart In Java Netbeans

Java Animated Chart


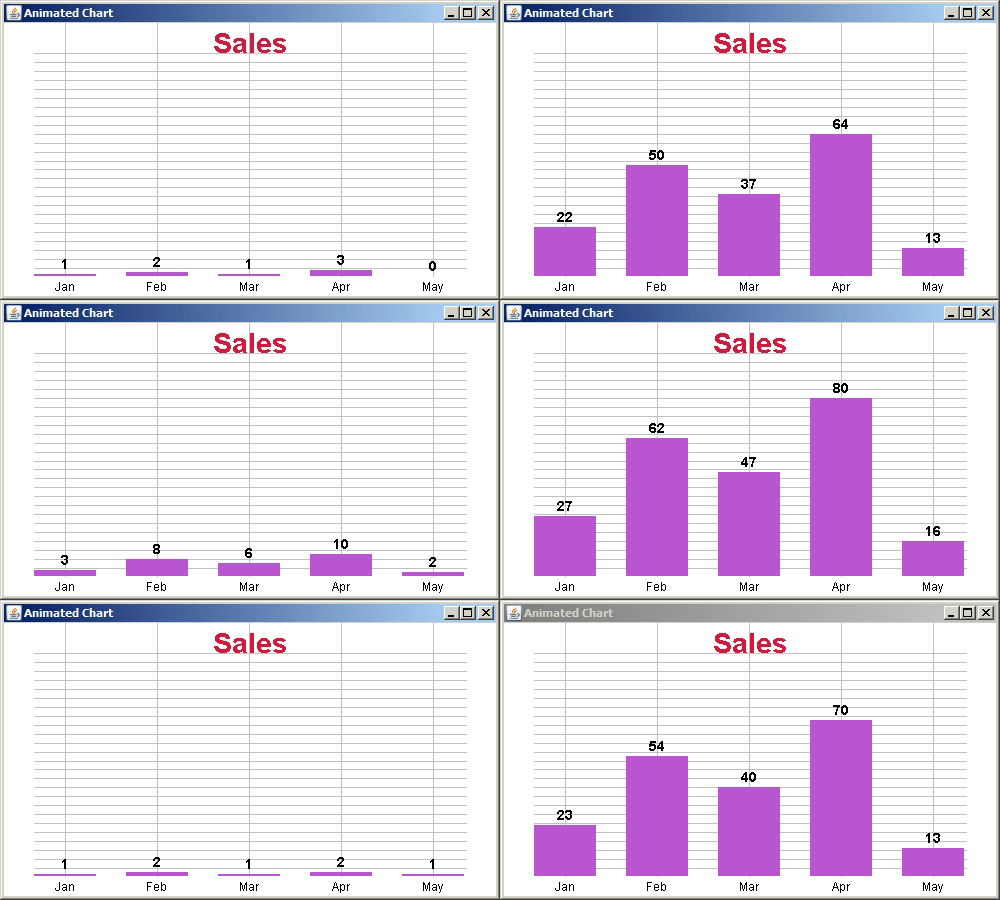
In this Java Tutorial we will see How To Create a Custom Animated chart displaying sales data for different months using graphics class in java netbeans.
This application display a bar chart representing sales data over several months, with the ability to transition between two sets of data.

What We Are Gonna Use In This Project:

- Java Programming Language.
- NetBeans Editor.


Project Source Code:


package animatedchart;

import java.awt.Color;
import java.awt.Font;
import java.awt.FontMetrics;
import java.awt.Graphics;
import javax.swing.JFrame;
import javax.swing.JPanel;
import javax.swing.Timer;

/**
 *
 * @author 1BestCsharp
 */
public class AnimatedChart extends JPanel{
    
    private String[] months = {"Jan","Feb","Mar","Apr","May"};
    //private int[] data1 = {30,50,70,40,60};
    //private int[] data1 = {100,100,100,100,100};
    private int[] data1 = {00,00,00,00,00};
    private int[] data2 = {27,63,47,81,16};
    private int[] currentData = data1;  // Initial data set
    private int animationDuration = 2000; // Duration of the animation in milliseconds
    private int animationSteps = 100; // Number of animation steps
    private int[] animatedData = new int[data1.length];
    private int step = 0;
    private Timer timer;
    private String chartTitle = "Sales";

    
    public AnimatedChart(){
        // Initialize the timer for the animation
        timer = new Timer(animationDuration / animationSteps, (e) -> {
            // Check if animation steps are completed
            if(step <= animationSteps){
// Gradually adjust values between the starting and ending datasets for smooth transition.
                for(int i = 0; i < data1.length; i++)
                {
                  int startValue = data1[i];  
                  int endValue = data2[i]; 
                  animatedData[i] = startValue + (endValue - startValue) * step / animationSteps;
                }
                
                step++;
                repaint();
            }
            else{
                // Animation is complete, switch to the new data set
                currentData = (currentData == data1) ? data2 : data1;
                step = 0;
                timer.stop();
            }
            
        });
        // Start the timer
        timer.start();
    }


    @Override
    protected void paintComponent(Graphics g){
        
        super.paintComponent(g);
        
        // Define chart dimensions and properties
        int chartWidth = getWidth();
        int chartHeight = getHeight();
        int barSpacing = 30;
        int barWidth = (chartWidth - (currentData.length+1) * barSpacing) / currentData.length;
        
        // Set colors and fonts
        g.setColor(new Color(63, 81, 181));
        Font titleFont = new Font("Arial", Font.BOLD, 28);
        Font labelFont = new Font("Arial", Font.PLAIN, 12);
        Font valueFont = new Font("Arial", Font.BOLD, 14);
        
        // Draw title
        FontMetrics titleMetrics = g.getFontMetrics(titleFont);
        int titleX = (chartWidth - titleMetrics.stringWidth(chartTitle))/2;
        int titleY = 30;
        g.setColor(new Color(220,20,60));
        g.setFont(titleFont);
        g.drawString(chartTitle, titleX, titleY);
        
        // Draw horizontal lines
        int numberOfLines = 25;
        for(int i = 1; i <= numberOfLines; i++){
            int y = chartHeight - i * (chartHeight - 50) / numberOfLines - 20;
            g.setColor(Color.LIGHT_GRAY);
            g.drawLine(barSpacing, y, chartWidth - barSpacing, y);
        }
        
        // Draw vertical lines
        for(int i = 0; i <= currentData.length; i++){
            int x = barSpacing + i * (barWidth + barSpacing) + barWidth / 2;
            g.setColor(Color.LIGHT_GRAY);
            g.drawLine(x, chartHeight - 20, x, 0);
        }
        
        // Draw the bars, labels, and values
        for(int i = 0; i < currentData.length; i++){
            int barHeight = (int)((double)animatedData[i] / 100 * (chartHeight - 50));
            int x = barSpacing + i * (barWidth + barSpacing);
            int y = chartHeight - barHeight - 20;
            
            // Draw the bar
            g.setColor(new Color(186,85,211));
            g.fillRect(x, y, barWidth, barHeight);
            
            // Draw the label (month)
            String label = months[i];
            int labelWidth = g.getFontMetrics(labelFont).stringWidth(label);
            int labelX = x + (barWidth - labelWidth) / 2;
            int labelY = chartHeight - 5;
            g.setColor(Color.black);
            g.setFont(labelFont);
            g.drawString(label, labelX, labelY);
            
            // Draw the value at the top of the bar
            String value = Integer.toString(animatedData[i]);
            int valueWidth = g.getFontMetrics(valueFont).stringWidth(value);
            int valueX = x + (barWidth - valueWidth) / 2;
            int valueY = y - 5;
            
            g.setColor(Color.black);
            g.setFont(valueFont);
            g.drawString(value, valueX, valueY);
        }
        
    }


    /**
     * @param args the command line arguments
     */
    public static void main(String[] args) {
        
        JFrame frame = new JFrame();
        frame.setTitle("Animated Chart");
        frame.setSize(500, 300);
        frame.setLocationRelativeTo(null);
        frame.setDefaultCloseOperation(JFrame.EXIT_ON_CLOSE);
        AnimatedChart chartPanel = new AnimatedChart();
        chartPanel.setBackground(Color.white);
        frame.add(chartPanel);
        frame.setVisible(true);
    }

}


The Final Result:

Animated Chart In Java


if you want the source code click on the download button below


Java Employee Management System Source Code

Create an Employee Management System Project Using Java And MySQL Database

Java Employee Management System Source Code

In this Java project demo, we will demonstrate the functionality of the employee management system we created using Java, NetBeans, and a MySQL database.

tools:
- java programming language.
- netbeans 8.2.
- mysql database.
- phpmyadmin.
- xampp server.
- pixabay.com ( website for free images ).
- canva.com ( if  you want to create images / logo ).

Watch This Full Demo

1 - The Login Form

The login form allows users to log in to the Employee System Dashboard.
The user needs to enter their email and password before clicking the login button.


The login form

The login form

The login form

2 - The Employee Dashboard Form

after the user successfully login, he will see this application dashboard with a menu using jpanel and jbuttons.
plus some data showing the number of employees, departments, Attendance Percentage and Total Salaries.
if the user type is "Admin" he will see the "Users" tab to manage users.

Dashboard Form - Admin

if the user type is "User" he will not see the manage users tab.

Dashboard Form - User


3 - The Departments Form

- this form allow the users to add, edit remove departments, and display all the departments in a jtable.

Departments Form

-  add a new department: When the Add button is clicked, it creates a new department with the entered details.

add a new department

add a new department


-  Search Department By ID: When the Search button is clicked, it retrieves the department details based on the entered ID and displays them in the respective fields.

Search Department By ID

Search Department By ID


-  Edit and Remove Department 
Edit: When the Edit button is clicked, it updates the details of an existing department based on the entered ID.
Remove: When the Remove button is clicked, it deletes the department with the specified

Delete Department By ID

Delete Department By ID


-  Departments List: When the List button is clicked, it opens a new window displaying a list of all departments.

Departments List

-  Department Employees: show employees of a selected department, which opens a new window listing the employees. 

Department Employees

4 - The Jobs Form

here the user can add a new job to the system. 
view all jobs in a jtable.
edit, remove the selected one.

Jobs Form


Add Job: Adds a new job with the entered details to the database.

Add Job

Add Job

Search Job: Retrieves job details by ID and populates the form fields.

Search Job

Search Job


Jobs Listing: Opens a new window displaying a list of jobs.

Jobs Listing

Show Emoployees In The Selected Job: A "Show Employees In This Position" button allows users to view employees assigned to a selected job. 
This opens a new JFrame displaying the list of employees for the selected job.

Show Emoployees In The Selected Department

Show Emoployees In The Selected Department


5 - The Employees Form

This is a simple form where the user can add a new employee, edit, remove, search and view a list of all the employees to the system.

Employees Form

ADD Employee: Collects input from fields, validates the data, saves the profile picture, and adds a new employee to the database. 
The Upload Button Opens a file chooser to upload a profile picture and displays the selected image.

ADD Employee

Edit Employee: Retrieves and updates existing employee details, handles profile picture updates, and saves changes to the database.

Edit Employee

Delete Employee: Deletes an employee based on the provided ID and clears the input fields.

Delete Employee

Search Employee: Searches for an employee by ID and populates the form with the retrieved details.

Search Employee


List Of Employees: Opens a new frame displaying the list of employees.

List Of Employees

The loadEmployees methods fetch employee data from the database based on the search criteria or load all employees. This data is then populated into the JTable.

fetch employee data from the database based on the search criteria


Employee Card: A button allows users to view detailed employee information in a separate "Employee Card" form.

Employee Card

"Employee Card" form.
Employee Card Form

8 - The Leave Form

This form represents a user interface for managing employee leaves in a Java Employee Management System. 
The form includes fields for entering and displaying leave details, such as ID, employee ID, leave type, start date, end date, status, and reason.

Leave Form

search employee and fetches employee details by ID
search employee and fetches employee details by ID

add a new leave record.

add a new leave record

search and fetches leave details by ID.
search and fetches leave details by ID

list form, retrieves and displays all leave requests in the table.
retrieve and display all leave requests in a table in the list form

Leaves Search: filters and displays leave requests based on the provided search criteria.

filters and displays leave requests based on the provided search criteria

filters and displays leave requests based on the provided search criteria

employee leaves button, opens a window to list leaves of a specific employee.
leaves list of a specific employee

leaves list of a specific employee

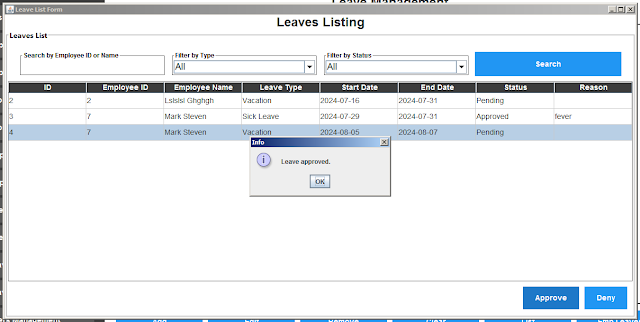
The user can interact with the form by searching for specific leave requests, filtering the list by type and status, and approving or denying selected leave requests.
leaves listing search


leaves listing search

7 - The Attendance Form

This form is responsible for managing employee attendance, providing functionalities to add, edit, remove, and list attendance records, and to fetch specific records by attendance ID.


Attendance Form

Add: Validates and adds a new attendance record to the database.

Validates and adds a new attendance record to the database


Search: Fetches attendance details by ID and populates the form.

Searchand Fetches attendance details by ID

Employee Attendance: Opens a new window displaying attendance records for a specific employee.

attendances list for a specific employee.

Attendance List: This form includes features for searching, filtering, and displaying attendance records, as well as marking employees as present or absent.

Attendance List

Attendance List Search.
Attendance List Search

Attendance List Search


9 - The Employee System - Manage Users

in this form you can manage the users.
this form contains:
1 - table with all users:
2 - a button to add a new user.
3 - a button to edit the selected user.
4 - a button to remove the selected user.


Manage Users


Add Button: Validates input and adds a new user.

Add a new user

Add a new user

Add a new user

Add a new user

List Button: Opens a new window displaying all users.