Java - Login And Register Form Design In One Window


How To Design SignUp And SignIn Form In One Jframe Using Java NetBeans

Java SignIn And SignUp Form Design


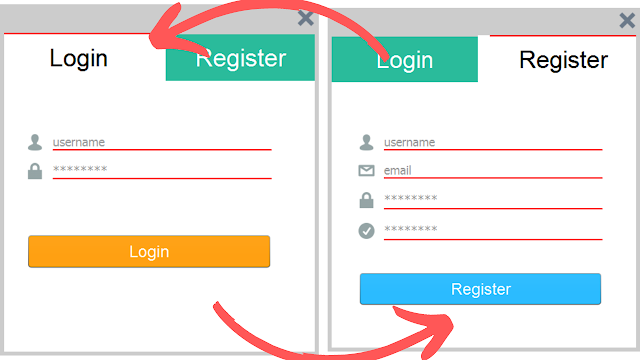
In this Java Tutorial we will see How To Design A Login Form And A Register Form In One Jframe Using JPanels In Java NetBeans .


flatuicolorpicker.com => to get flat colors.
iconsdb.com => for icons.


Project Source Code:


    // create borders
    Border default_top_border = BorderFactory.createMatteBorder(2, 0, 0, 0, new Color(204,204,204));
    Border red_top_border = BorderFactory.createMatteBorder(2, 0, 0, 0, Color.red);
    Border textField_border = BorderFactory.createMatteBorder(0, 0, 2, 0, Color.red);
    
    // create an array of componenet
    Component[] comps;
    HashMap<Component, String> map = new HashMap<>();
    
    public Login_Register() {
        initComponents();
        
        // center form 
        this.setLocationRelativeTo(null);
        
        // we can add a focus in and out like we did in the login panel
        // or we can make it with a loop
        
        // populate the comps
        comps = jPanel_register.getComponents();
        
        // populate the hashmap
        for (Component comp : comps) {
           
            if(comp instanceof JTextField)
            {
                JTextField textField = (JTextField) comp;
                map.put(textField,textField.getText());
            }
            else if(comp instanceof JPasswordField)
            {
                JPasswordField passField = (JPasswordField) comp;
                map.put(passField,String.valueOf(passField.getPassword()));
            }
            
        }
        
        // set borders
        jLabel_login.setBorder(default_top_border);
        jLabel_register.setBorder(default_top_border);
        jTextField_login_username.setBorder(textField_border);
        jPasswordField_login_pass.setBorder(textField_border);
        jTextField_register_username.setBorder(textField_border);
        jTextField_register_email.setBorder(textField_border);
        jPasswordField_register_pass.setBorder(textField_border);
        jPasswordField_register_confirmPass.setBorder(textField_border);
        
        // show icons
        jLabel_close.setIcon(new ImageIcon(getClass().getResource("IMAGES/x-mark.png")));
        jLabel_login_username.setIcon(new ImageIcon(getClass().getResource("IMAGES/contacts.png")));
        jLabel_login_password.setIcon(new ImageIcon(getClass().getResource("IMAGES/lock.png")));
        jLabel_register_username.setIcon(new ImageIcon(getClass().getResource("IMAGES/contacts.png")));
        jLabel_register_email.setIcon(new ImageIcon(getClass().getResource("IMAGES/email.png")));
        jLabel_register_password.setIcon(new ImageIcon(getClass().getResource("IMAGES/lock.png")));
        jLabel_register_confirm_password.setIcon(new ImageIcon(getClass().getResource("IMAGES/ok.png")));
        
        // add the focus events
        addFocusEvent();
        
        // call the jlabel mouse click event
        jLabel_loginMouseClicked(null);
        
    }   


    // create a function for the focus in
    public void focusIn(JTextField textField, JPasswordField passField, String originalText)
    {
        // for the jpassword
        if(passField != null)
        {
            String passValue = String.valueOf(passField.getPassword());
            
            if(passValue.equals(originalText))
            {
                passField.setText("");
                passField.setForeground(Color.black);
            }
            
        }
        // for the jtextfield
        else
        {
            String textFieldValue = textField.getText().trim().toLowerCase();
        
            if(textFieldValue.equals(originalText))
            {
                textField.setText("");
                textField.setForeground(Color.black);
            }
        }
        
    }
    
    // create a function for the focus out
    public void focusOut(JTextField textField, JPasswordField passField, String originalText)
    {
        // for the jpassword
        if(passField != null)
        {
            String passValue = String.valueOf(passField.getPassword());
            
            if(passValue.equals(originalText) || passValue.equals(""))
            {
                passField.setText(originalText);
                passField.setForeground(new Color(153,153,153));
            }
            
        }
        
        // for the jtextfield
        else
        {
            String textFieldValue = textField.getText().trim().toLowerCase();

            if(textFieldValue.equals(originalText) || textFieldValue.equals(""))
            {
                textField.setText(originalText);
                textField.setForeground(new Color(153,153,153));
            }
        }
    }


    private void jTextField_login_usernameFocusGained(java.awt.event.FocusEvent evt) {                                                      
        // if the jtextfield text = username
        // clear the textfield
        String usernameValue = jTextField_login_username.getText().trim().toLowerCase();
        
        if(usernameValue.equals("username"))
        {
            jTextField_login_username.setText("");
            jTextField_login_username.setForeground(Color.black);
        }
        
    }                                                     

    private void jTextField_login_usernameFocusLost(java.awt.event.FocusEvent evt) {                                                    
        // if the textfield is empty -> set the text to 'username'
        String usernameValue = jTextField_login_username.getText().trim().toLowerCase();
        
        if(usernameValue.equals("username") || usernameValue.equals(""))
        {
            jTextField_login_username.setText("username");
            jTextField_login_username.setForeground(new Color(153,153,153));
        }
        
    }                                                   


    private void jPasswordField_login_passFocusGained(java.awt.event.FocusEvent evt) {                                                      
        // if the jpassword text = password
        // clear the textfield
        String passValue = String.valueOf(jPasswordField_login_pass.getPassword()).trim().toLowerCase();
        
        if(passValue.equals("password"))
        {
            jPasswordField_login_pass.setText("");
            jPasswordField_login_pass.setForeground(Color.black);
        }
    }                                                     

    private void jPasswordField_login_passFocusLost(java.awt.event.FocusEvent evt) {                                                    
        // if the textfield is empty -> set the text to 'password'
        String passValue = String.valueOf(jPasswordField_login_pass.getPassword()).trim().toLowerCase();
        
        if(passValue.equals("password") || passValue.equals(""))
        {
            jPasswordField_login_pass.setText("password");
            jPasswordField_login_pass.setForeground(new Color(153,153,153));
        }
    }                                                   


    // add the focus event to jtextfields
    public void addFocusEvent()
    {
        for (Component comp : comps) {
           
            if(comp instanceof JTextField)
            {
                JTextField textField = (JTextField) comp;
                
                textField.addFocusListener(new FocusListener() {
                    @Override
                    public void focusGained(FocusEvent e) {
                        
                        focusIn(textField, null, map.get(textField));
                        
                    }

                    @Override
                    public void focusLost(FocusEvent e) {
                        
                        focusOut(textField, null, map.get(textField));
                        
                    }
                });
            }
            else if(comp instanceof JPasswordField)
            {
                JPasswordField passField = (JPasswordField) comp;
                
                passField.addFocusListener(new FocusListener() {
                    @Override
                    public void focusGained(FocusEvent e) {
                        
                        focusIn(passField, null, map.get(passField));
                        
                    }

                    @Override
                    public void focusLost(FocusEvent e) {
                        
                        focusOut(passField, null, map.get(passField));
                        
                    }
                });
            }
            
        }
    }


    private void jLabel_closeMouseClicked(java.awt.event.MouseEvent evt) {                                          
        // close this form
        this.dispose();
    }


////// OUTPUT : 


java design signin form

java design sign up form


download the source code


More Java Projects:


VB.Net - Real Estate Management System Source Code

Real Estate Management System Project Source Code Using Visual Basic .Net And MySQL Database

Real Estate Management System Project Using VB.Net

in this vb.net project tutorial serie we will see how to make a real estate management system project using windowForm in visual basic .net programming language and mysql database.

goals of this project:
- give students / curious persons an example so they can learn from it.
- helping people create their first project. 
- sharing knowledge with others.

tools:
- vb.net programming language.
- microsoft visual studio express 2013.
- mysql database.
- phpmyadmin.
- xampp server.
- pixabay.com ( website for free images ).

Watch This Full Demo


1 - The Login Form

the login form will allow the Users to login into the Real-Estate application Main Form.
the user need to enter his username and password before clicking the login button.


login from


if the user let the username or password empty, the textbox and label background color will become red.


login from 2


login from 3

if the user enter wrong username or password an error message will show up under the password fields.


login from 4


and if the user enter the correct data and click on the login button the main real estate management system form will show up and the login form will closed.


2 - The Real Estate System Main Project Form

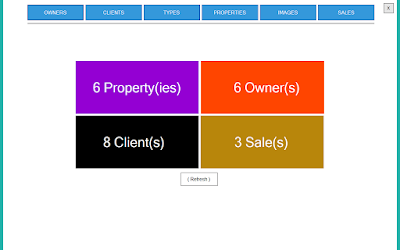
after the user successffully login, he will see this main project window with a menu using panels and buttons.
the user can select where he want to go by clicking the on the item from the menu.

main form

this form contains a menu on the top to make it easy for the user to navigate on the application.

menu

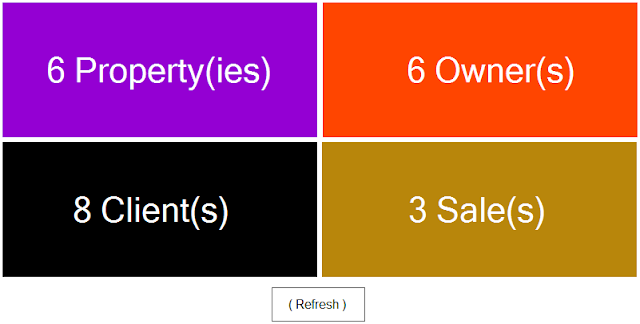
with the menu this form contains also statics part in the middle of the form to show the user how many properties, owners, clients, and sales are in the application.
+ a refresh button to see the new statics when ever he add or remove an item.

statics


3 - The Real Estate System, Manage Clients Form


- this form contains a datagridview with all clients data.

- to add a new client, enter his data and click on "Add" button.

- to edit a client you need to select the one you wan to edit from the datagridview and enter his new data.

- when you want to delete a client just select the client you want to remove and click on the "Remove" button.
- to make it easy for the user when he want to add a new client, he can clear all textboxes by clicking on the "Clear Fields" button.

clients form

4 - The Real Estate System, Manage Owners Form


this form is pretty much like the clients form.

you can add, edit, remove selected owner and all the good stuff.

owners form

if you want to see the selected owner properties, just select the owner from the datagridview and click the "Show This Owner's Properties" button, and a form will show up with all owner's properties in it.


owner's properties

5 - The Real Estate System - Manage Property's Types Form


in this form the user can manage the types of properties in the system project.
all types are displayed in a listbox, if you select an item from the listbox it will be displayed on the textboxes.


types form


7 - The Real Estate System , Manage Property Form


this form contains textBoxes, numericUpDown, checkBoxes and one comboBox populated  with all types.


properties form


in this form the user can add, edit, search and remove a property.
when the user want to add/edit a property he need to select an owner for this property, and he can do that by clicking on the "Select Owner" button and a form will show up with a datagrdview filled with all owners, allowing the user to select an owner.
when the user double click on the datagridview the "select owner" form will be closed and the owner id will be set into the textbox.


owners list

if the user want to search for a property all he need to do is to enter the property's id and click on the "Search" button.

search for a property


Some Notes: each property need to be assigned to a type, which can be selected from the combobx.
if the user let the age at "0" it mean that the real estate is brand new
( except for the lands because ... well it's a land :/ )

if the user want to see the selected property images by clicking on the "Show This Property Images".


property images slider


if the user want to see all properties list by clicking on the "Show All Properties" button .


properties list form

8 - The Real Estate System , Manage Property's Images Form


this form contains 2 datagridviews,1 listbox and 1 picturebox.
- datagridview 1 is filled with all types.
- datagridview 2 is filled with all properties, when the user select a type from datagridview 1 all properties in this type will be displayed in datagridview 2.
- the listbox is populated with all properties images, when the user select a property from datagridview 2 all images of this property will be displayed in listbox.
- when the user select an image from the listbox, the selected image will be displayed in the picturebox.

the user can browse a photo from his computer and add it to the selected property.
the user can remove the selected image by selecting it from the listbox.
there is no edit image, just add and remove.


manage property images form


manage property images form 2


when you click on the "Show This Property Images" a form will show up with a SlideShow to display the images and two buttons to navigate + a label displaying the total images for the selected property.


images slider

9 - The Real Estate System , Manage Sales Form


in this form the user can manage the properties sales.
this form contains 2 datagridviews:
1 - display the sales.
2 - display the properties.
and you can add, edit remove the selected sale.


sales form

to display only the clients the user need to click on the "Show Clients" button. 


show clients

the properties are displayed by default but if the user click to show the clients and want to see the properties again he need to click on the "Show Properties" button. 


show properties


to display only the properties sold, click on the "Properties Sold" button under the  datagridview


Properties Sold

to display only the properties NOT sold, click on the "Properties Not Sold" button under the  datagridview. 


Properties Not Sold


if you want the source code click on the download button below