Java Digital Clock In Netbeans

How to Create Digital Clock in Java NetBeans

Java Digital Clock In Netbeans


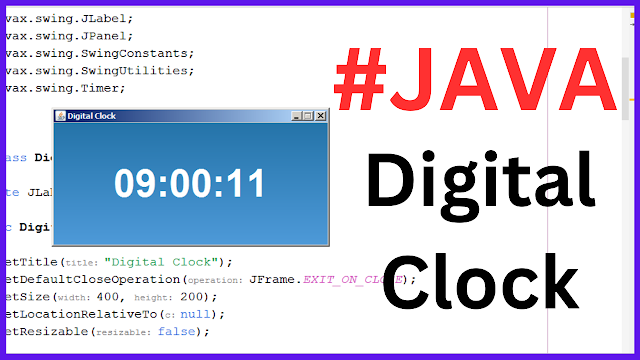
In this Java Tutorial we will see How To Make a Digital Clock, With Hours, Minutes and Seconds In Netbeans.

What We Are Gonna Use In This Project:

- Java Programming Language.
- NetBeans Editor.

What We Will Do In This Project:

- Create a JPanel named centerPanel with a visually appealing gradient background.
- Create a JLabel to display the current time.
Update Timer continuously using a Timer that calls the updateClock method every second.


Project Source Code:


package new_tutorials;

import java.awt.Color;
import java.awt.Font;
import java.awt.GradientPaint;
import java.awt.Graphics;
import java.awt.Graphics2D;
import java.awt.GridBagConstraints;
import java.awt.GridBagLayout;
import java.awt.Insets;
import java.awt.Point;
import java.text.SimpleDateFormat;
import java.util.Date;
import javax.swing.JFrame;
import javax.swing.JLabel;
import javax.swing.JPanel;
import javax.swing.SwingConstants;
import javax.swing.SwingUtilities;
import javax.swing.Timer;


public class Digital_Clock extends JFrame {

    private JLabel timeLabel;
    
    public Digital_Clock(){
    
        setTitle("Digital Clock");
        setDefaultCloseOperation(JFrame.EXIT_ON_CLOSE);
        setSize(400, 200);
        setLocationRelativeTo(null);
        setResizable(false);

        
    // Create a JPanel with a background gradient    
    JPanel centerPanel = new JPanel(new GridBagLayout()){
    
        @Override
        protected void paintComponent(Graphics g){
            
            super.paintComponent(g);
            Graphics2D g2d = (Graphics2D) g.create();
            
            // Define a gradient paint for the background
            GradientPaint gradient = new GradientPaint(new Point(0,0), new Color(37, 116, 169),
                                new Point(0,getHeight()), new Color(78, 154, 217) );
            
            g2d.setPaint(gradient);
            
            // Fill the panel with the gradient paint
            g2d.fillRect(0,0,getWidth(), getHeight());
            g2d.dispose();          
        }
    };
    add(centerPanel);
    
    timeLabel = new JLabel();
    timeLabel.setFont(new Font("Arial", Font.BOLD, 56));
    timeLabel.setHorizontalAlignment(SwingConstants.CENTER);
    timeLabel.setForeground(Color.white);
    
    
     // Add timeLabel to the center panel with padding
        GridBagConstraints gbc = new GridBagConstraints();
        gbc.gridx = 0;
        gbc.gridy = 0;
        gbc.insets = new Insets(30, 30, 30, 30);  // Padding
        
        centerPanel.add(timeLabel, gbc);
        
        // Start a timer to update the clock every second
        Timer timer = new Timer(1000, e->updateClock());
        timer.start();
        
        // Initial clock update
        updateClock();
    
    }
    
    private void updateClock(){
        
        SimpleDateFormat sdf = new SimpleDateFormat("HH:mm:ss");
        String currentTime = sdf .format(new Date());
        timeLabel.setText(currentTime);
        
    }
    
    
    public static void main(String[] args)
    {
        SwingUtilities.invokeLater(()->{});
        
           Digital_Clock dc = new Digital_Clock();
           dc.setVisible(true);
        
    }
    
    
}


The Final Result:


Java Digital Clock


JavaScript Table Search Bar

How to Search on an HTML Table Using JavaScript


javascript-table-search-bar


In this Javascript tutorial, we will see how to use JavaScript to filter table data dynamically based on the input text value. 
Users can enter their search queries in the input field, and the table will instantly update to display only the rows that match the search criteria. 
This feature improves data accessibility and enables users to quickly find the information they need within a large dataset..


Project Source Code:


<!DOCTYPE html>
<html>
<head>
<title>Table Search</title>

<style>

*{
box-sizing: border-box;
font-family: Arial, sans-serif;
}

body{
background-color: #f0f0f0;
margin: 0;
}

#table{
border-collapse: collapse;
margin: 20px auto;
background-color: #fff;
width: 80%;
max-width: 800px;
border-radius: 5px;
box-shadow: 0px 0px 10px rgba(0, 0, 0,0.2);
}

#table th,
#table td{
padding: 10px;
text-align: center;
border: 1px solid #ccc;
}

#table th{ background-color: #f9f9f9; font-weight: bold; }

#table tbody tr:hover{ background-color: #f5f5f5; }

#search-input{
border: none;
border-radius: 5px;
padding: 10px;
width: 80%;
max-width: 600px;
margin: 20px auto;
display: block;
font-size: 16px;
box-shadow: 0px 0px 10px rgba(0, 0, 0,0.2);
}

#search-input::placeholder{ color: #aaa; }


</style>

</head>
<body>
<table id="table">
<thead>
<tr>
<th>Name</th>
<th>Age</th>
<th>Gender</th>
<th>City</th>
</tr>
</thead>
<tbody>
<tr>
<td>John Doe</td>
<td>30</td>
<td>Male</td>
<td>New York</td>
</tr>
<tr>
<td>Jane Smith</td>
<td>25</td>
<td>Female</td>
<td>Los Angeles</td>
</tr>
<tr>
<td>Bob Johnson</td>
<td>35</td>
<td>Male</td>
<td>Chicago</td>
</tr>
</tbody>
</table>
<br>
<input type="text" id="search-input" placeholder="Search...">

<script>
const input = document.getElementById("search-input");
input.addEventListener("input",function(){

// get the value of the input
const searchValue = this.value.toLowerCase();
// get all the rows in the table
const rows = document.querySelectorAll("#table tbody tr");
rows.forEach(row=>{
// get all the cells in the current row
const cells = row.querySelectorAll("td");
// initialize a flag to check if the row contains the search value
let containsValue = false;
// loop through the cells and check if the cell contains the search value
cells.forEach(cell=>{

if(cell.textContent.toLowerCase().includes(searchValue))
{
containsValue = true;
}

});

// if the row contains the search value, show it, otherwise hide it
if(containsValue){ row.style.display = ""; }

else { row.style.display = "none"; }

})

});


</script>

</body>
</html>


Code Explanation:

This JavaScript code performs the following actions:

1 - Attaching an Event Listener: The JavaScript code retrieves the search input element using its id, "search-input", and attaches an event listener to it. The event being listened to is the "input" event, which fires whenever the user modifies the input field.

2 - Implementing the Search Logic: Inside the event listener, the code retrieves the value entered into the search input field and converts it to lowercase. This allows for case-insensitive searching. The code then selects all the rows in the table's tbody using the querySelectorAll() method and assigns them to the "rows" variable.

3 - Iterating Over Each Row and Cell: A forEach loop is used to iterate over each row in the table. For each row, another forEach loop is used to iterate over each cell (td element) within that row.

4 - Checking for a Match: For each cell, the code compares the text content within the cell to the search value. If the search value is found within the cell's content (case-insensitive match), a flag variable "containsValue" is set to true.

5 - Displaying or Hiding Rows: After examining all the cells within a row, the code checks the value of the "containsValue" flag. If it is true, indicating that the row contains the search value, the row is displayed by setting its style.display property to an empty string. Otherwise, if the flag is false, indicating no match, the row is hidden by setting its style.display property to "none".


OUTPUT:

JavaScript Table Search Bar


How To Create a Table Search Bar with JavaScript


C# Login And Register Form With Text File

How to Create Login and Register Form in C# with Text File


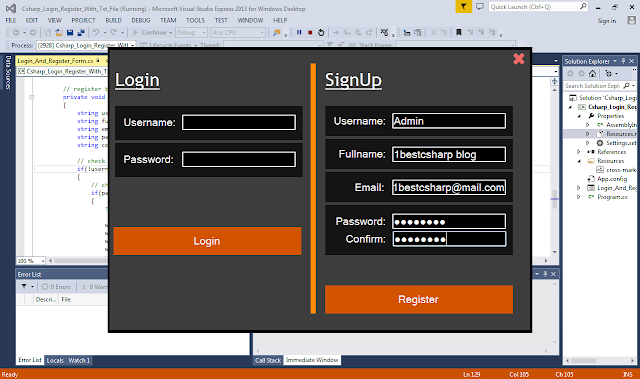
in this c# form design tutorial we will see how to design a login and register form with a text file in one form using csharp programming language .

tools:
- c# programming language.
- microsoft visual studio express 2013.
- text file.
- pixabay.com ( images).

Watch This Full Demo


▶ Download All C# Projects Source Code

- The Project Source Code


using System;
using System.Collections;
using System.Collections.Generic;
using System.ComponentModel;
using System.Data;
using System.Drawing;
using System.IO;
using System.Linq;
using System.Text;
using System.Threading.Tasks;
using System.Windows.Forms;

namespace Csharp_Login_Register_With_Txt_File
{
    public partial class Login_And_Register_Form : Form
    {
        public Login_And_Register_Form()
        {
            InitializeComponent();
        }

        string filepath = @"C:\Users\1BestCsharp\Desktop\files\users.txt";
        // arraylist of usernames
        ArrayList allusernames = new ArrayList();
        // dictionary of usernames and passwords
        Dictionary<string, string> usernameANDpassword = new Dictionary<string, string>();


        // create a function to get all the usernames and passwords
        public void getUsers()
        {
            string[] lines = File.ReadAllLines(filepath);
            string[] values;
            string un = "";
            string ps = "";

            for(int i = 0; i < lines.Length; i++)
            {
                values = lines[i].ToString().Split(':');

                if(values[0].Trim().Equals("Username"))
                {
                    un = values[1];
                    // add username to arraylist
                    allusernames.Add(un);
                }
                else if (values[0].Trim().Equals("Password"))
                {
                    ps = values[1];
                }
                if (un != "" && ps != "")
                {
                    // add usernames and passwords to dictionary
                    usernameANDpassword.Add(un, ps);

                    // clear username and password
                    un = "";
                    ps = "";
                }

            }

        }


        // close the form
        private void pictureBoxClose_Click(object sender, EventArgs e)
        {
            Environment.Exit(Environment.ExitCode);
        }

        private void Login_And_Register_Form_Load(object sender, EventArgs e)
        {
            // display the close icon
            pictureBoxClose.Image = Properties.Resources.cross_mark;

            getUsers();
        }

        // login button
        private void buttonLogin_Click(object sender, EventArgs e)
        {
            string username = textBoxUsername.Text;
            string password = textBoxPassword.Text;
            bool userExist = false;

            if(username.Trim().Equals("") || password.Trim().Equals(""))
            {
                MessageBox.Show("You Need To Enter The Username And Password","Empty Fields",MessageBoxButtons.OK, MessageBoxIcon.Stop);
            }
            else
            {
                foreach(var uname in usernameANDpassword)
                {
                    // check if the username exist
                    if(uname.Key.ToString().Trim().Equals(username))
                    {
                        // check if the password exist
                        if(uname.Value.ToString().Trim().Equals(password))
                        {
                            userExist = true;
                            break;
                        }
                    }
                }
                if(userExist)
                {
                    MessageBox.Show("This User Exists", "Login", MessageBoxButtons.OK, MessageBoxIcon.Information);
                }
                else
                {
                    MessageBox.Show("This User Doesn't Exists", "Login", MessageBoxButtons.OK, MessageBoxIcon.Information);
                }
            }
        }

        // register button
        private void buttonRegister_Click(object sender, EventArgs e)
        {
            string username = textBox_RG_Username.Text;
            string fullname = textBox_RG_Fullname.Text;
            string email = textBox_RG_Email.Text;
            string password = textBox_RG_Password.Text;
            string confirmpass = textBox_RG_ConfirmPass.Text;

            // check if the textbox are not empty
            if(!username.Trim().Equals("") && !fullname.Trim().Equals("") && !email.Trim().Equals("") && !password.Trim().Equals(""))
            {
                // check if the password confiramtion are correct
                if(password.Equals(confirmpass))
                {
                    TextWriter writer = new StreamWriter(filepath, true);

                    writer.Write("Username: " + username);
                    writer.WriteLine("");//new line
                    writer.Write("Fullname: " + fullname);
                    writer.WriteLine("");//new line
                    writer.Write("Email: " + email);
                    writer.WriteLine("");//new line
                    writer.Write("Password: " + password);
                    writer.WriteLine("");//new line
                    writer.Write("----------");
                    writer.WriteLine("");//new line

                    writer.Close();
                    MessageBox.Show("Account Created Successfully", "Register", MessageBoxButtons.OK, MessageBoxIcon.Information);
                    usernameANDpassword.Add(username, password);
                }
                else
                {
                    MessageBox.Show("Confirmation Password Error", "Error", MessageBoxButtons.OK, MessageBoxIcon.Warning);
                }
            }
            else
            {
                MessageBox.Show("One Ore More Fileds Are Empty", "Error", MessageBoxButtons.OK, MessageBoxIcon.Warning);
            }


        }
    }
}


Java - Photo Editor App Source Code In Java Netbeans


How To Create a Photo Editor App In Java  Using NetBeans

Photo Editor App In Java Netbeans


In this Java Tutorial we will see How to Create a Simple Photo Editor App Using  Jframe JPanels, JLabels and JButtons In Java NetBeans.
This Java Application allows Users to select an image file and apply a range of filters such as grayscale, invert colors, sepia, blur, and edge detection, and save the edited image as a new one.


Project Source Code:

Create the PhotoEditorApp Class:


package photoeditorapp;

import java.awt.BorderLayout;
import java.awt.Color;
import java.awt.Graphics;
import java.awt.image.BufferedImage;
import java.awt.image.ColorModel;
import java.awt.image.WritableRaster;
import java.io.File;
import javax.imageio.ImageIO;
import javax.swing.ImageIcon;
import javax.swing.JButton;
import javax.swing.JFileChooser;
import javax.swing.JFrame;
import javax.swing.JLabel;
import javax.swing.JMenu;
import javax.swing.JMenuBar;
import javax.swing.JMenuItem;
import javax.swing.JOptionPane;
import javax.swing.JPanel;
import javax.swing.UIManager;
import javax.swing.filechooser.FileNameExtensionFilter;

/**
 *
 * @author 1BestCsharp
 */
public class PhotoEditorApp extends JFrame {
    
    private BufferedImage originalImage;
    private BufferedImage editedImage;
    private JLabel imageLabel;
    
    public PhotoEditorApp(){
        
        setTitle("Photo Editor App");
        setDefaultCloseOperation(JFrame.EXIT_ON_CLOSE);
        setSize(800, 600);
        
        setLocationRelativeTo(null);
        
        createMenuBar();
        
        imageLabel = new JLabel();
        add(imageLabel, BorderLayout.CENTER);
        
        JButton grayScaleButton = new JButton("Gray Scale");
        grayScaleButton.setBackground(Color.darkGray);
        grayScaleButton.setForeground(Color.white);
        grayScaleButton.addActionListener(e -> applyGrayScaleFilter());
        
        JButton invertButton = new JButton("Invert");
        invertButton.setBackground(Color.darkGray);
        invertButton.setForeground(Color.white);
        invertButton.addActionListener(e -> applyInvertColorsFilter());
        
        JButton sepiaButton = new JButton("Sepia");
        sepiaButton.setBackground(Color.darkGray);
        sepiaButton.setForeground(Color.white);
        sepiaButton.addActionListener(e -> applySepiaFilter());
        
        JButton blurButton = new JButton("Blur");
        blurButton.setBackground(Color.darkGray);
        blurButton.setForeground(Color.white);
        blurButton.addActionListener(e -> applyBlurFilter());
        
        JButton edgeDetectionButton = new JButton("Edge Detection");
        edgeDetectionButton.setBackground(Color.darkGray);
        edgeDetectionButton.setForeground(Color.white);
        edgeDetectionButton.addActionListener(e -> applyEdgeDetectionFilter());
        
        JButton resetButton = new JButton("Reset");
        resetButton.setBackground(Color.red);
        resetButton.setForeground(Color.white);
        resetButton.addActionListener(e -> resetImage());
        
        JPanel buttonPanel = new JPanel();
        buttonPanel.add(grayScaleButton);
        buttonPanel.add(invertButton);
        buttonPanel.add(sepiaButton);
        buttonPanel.add(blurButton);
        buttonPanel.add(edgeDetectionButton);
        buttonPanel.add(resetButton);
        
        add(buttonPanel, BorderLayout.SOUTH);
        
        setVisible(true);
    }
    
    
        private void createMenuBar(){
            // Create a menu bar for the application
            JMenuBar menuBar = new JMenuBar();
            // Create a "File" menu
            JMenu fileMenu = new JMenu("File");
            
            // Create "Open" menu item and set an action listener to handle its click event
            JMenuItem openItem = new JMenuItem("open");
            openItem.addActionListener(e -> openImage());
            
            // Create "Save" menu item and set an action listener to handle its click event
            JMenuItem saveItem = new JMenuItem("save");
            saveItem.addActionListener(e -> saveImage());
            
            // Add "Open" and "Save" menu items to the "File" menu
            fileMenu.add(openItem);
            fileMenu.add(saveItem);
            
            // Add the "File" menu to the menu bar
            menuBar.add(fileMenu);
                
            // Set the menu bar for the application window
            setJMenuBar(menuBar);
        }
        
        
        // Create a Method to update the image label with the edited image
        private void updateImageLabel(){
            
            // Create an ImageIcon from the editedImage
            ImageIcon imageIcon = new ImageIcon(editedImage);
            // Set the image icon on the imageLabel to display the edited image
            imageLabel.setIcon(imageIcon);
            // Revalidate the imageLabel to ensure the updated image is displayed correctly
            imageLabel.revalidate();
            
        }
        
        
        // Create a Method to reset the edited image back to the original image
        private void resetImage(){
            
            // Check if there is an original image available
            if(originalImage != null){
                // Create a deep copy of the original image and set it as the edited image
                editedImage = copyImage(originalImage);
                // Update the image label with the new edited image
                updateImageLabel();
                
            }
            
        }
        
        
        // create a method that creates a deep copy of a BufferedImage.
        private BufferedImage copyImage(BufferedImage image){
            
            // Get the ColorModel of the input image.
            ColorModel cm = image.getColorModel();
            // Check if the alpha channel of the image is premultiplied.
            boolean isAlphaPrm = cm.isAlphaPremultiplied();
            // Create a new WritableRaster that contains a copy of the image's data.
            WritableRaster raster = image.copyData(null);
            // Create and return a new BufferedImage using the ColorModel, WritableRaster,
            // and the information about the alpha channel pre-multiplication.
            return new BufferedImage(cm, raster, isAlphaPrm, null);
            
        }
        
    
        // create a method to select and display an image
        private void openImage(){
            // Create a file chooser dialog for selecting an image file
            JFileChooser fileChooser = new JFileChooser();
            fileChooser.setFileFilter(new FileNameExtensionFilter("images", "jpg", "png"));
            
            // Display the file chooser dialog and wait for the user to select a file
            int result = fileChooser.showOpenDialog(this);
            if(result == JFileChooser.APPROVE_OPTION)
            {
                 // Get the selected file
                File selectedFile = fileChooser.getSelectedFile();
                
                try
                {
                    // Check if the selected file is a valid image file
                    BufferedImage testImage = ImageIO.read(selectedFile);
                    if(testImage == null)
                    {
                        // Show an error message if the selected file is not a valid image
                        JOptionPane.showMessageDialog(this, "Invalid Image File Selected", "Error", JOptionPane.ERROR_MESSAGE);
                        return;
                    }
                    
                    // Store the original image and create a copy for editing
                    originalImage = testImage;
                    editedImage = copyImage(originalImage);
                    
                    // Update the image label to display the loaded image
                    updateImageLabel();
                }
                catch(Exception ex)
                {
                    // Print any exceptions that occur during image loading
                    ex.printStackTrace();
                    // Show an error message if there's an issue loading the image
                    JOptionPane.showMessageDialog(this, "Error Loading The Image", "Error", JOptionPane.ERROR_MESSAGE);                       
                }
            }                     
        }
        
        
        // create a Method to save the edited image
        private void saveImage()
        {

            // Create a file chooser dialog for selecting an image file
            JFileChooser fileChooser = new JFileChooser();
            fileChooser.setFileFilter(new FileNameExtensionFilter("images", "jpg", "png"));
            
            // Show the save dialog to allow the user to choose a location to save the image
            int result = fileChooser.showSaveDialog(this);
            // If the user selects a location and clicks the "Save" button
            if(result == JFileChooser.APPROVE_OPTION)
            {
                // Get the selected file and attempt to save the edited image to it
                File selectedFile = fileChooser.getSelectedFile();
                
                try
                {
                   
                    ImageIO.write(editedImage, "jpg", selectedFile);  
                }
                catch(Exception ex)
                {
                    // Print any exceptions that occur during image loading
                    ex.printStackTrace();
                    // Show an error message if there's an issue loading the image
                    JOptionPane.showMessageDialog(this, "Error Saving The Image", "Error", JOptionPane.ERROR_MESSAGE);                       
                }
            }  
            
        }


// create a method that applies a grayscale filter to the edited image using the luminosity method
    private void applyGrayScaleFilter()
    {
        // Check if the original image exists
        if(originalImage != null)
        {
            // Loop through all the pixels in the edited image
            for(int x = 0; x < editedImage.getWidth(); x++)
            {
                for(int y = 0; y < editedImage.getHeight(); y++)
                {
                  // Get the RGB value of the corresponding pixel in the original image
                  int rgb = originalImage.getRGB(x, y);
                  // Calculate the grayscale value using the luminosity method
                  int gray = (int) (0.3 * ((rgb >> 16) & 0xFF) + 0.59 * ((rgb >> 8) & 0xFF) + 0.11 * (rgb & 0xFF) );
                  
                  // Set the grayscale pixel in the edited image
                  editedImage.setRGB(x, y, (gray << 16) | (gray << 8) | gray);
                }
            }
            
            // Update the image label with the edited image
            updateImageLabel();
        }
    }
        
    
    // create a method that applies a sepia filter to the edited image
    private void applySepiaFilter()
    {
        // Check if the original image exists
        if(originalImage != null)
        {
            // Loop through all the pixels in the edited image
            for(int x = 0; x < editedImage.getWidth(); x++)
            {
                for(int y = 0; y < editedImage.getHeight(); y++)
                {
                    // Get the RGB value of the corresponding pixel in the original image
                    int rgb = editedImage.getRGB(x, y);
                    
                    // Extract the red, green, and blue components from the RGB value
                    int r = (rgb >> 16) & 0xFF;
                    int g = (rgb >> 8) & 0xFF;
                    int b = rgb & 0xFF;
                    
                    // Calculate the sepia values for red, green, and blue components
                    int tr = (int) (0.393 * r + 0.769 * g + 0.189 * b);
                    int tg = (int) (0.349 * r + 0.686 * g + 0.168 * b);
                    int tb = (int) (0.272 * r + 0.534 * g + 0.131 * b);

                    // Ensure the sepia values are within the valid range of 0 to 255
                    tr = Math.min(255,tr);
                    tg = Math.min(255,tg);
                    tb = Math.min(255,tb);
                    
                    // Set the sepia pixel in the edited image
                    editedImage.setRGB(x, y, (tr << 16) | (tg << 8) | tb);
                }
            }
            
            // Update the image label with the edited image
            updateImageLabel();
        }
    }
        
    
// create a that method applies a simple blur filter to the edited image using a 3x3 kernel.
private void applyBlurFilter()
{
    
    // Check if the original image exists
        if(originalImage != null)
        {
            // Define a 3x3 kernel for blurring
            int[][] kernel = {{1,1,1},{1,1,1},{1,1,1}};
            int kernelSum = 9; // Sum of kernel values (used for normalization)
            
            // Loop through all the pixels in the edited image (excluding the borders)
            for(int x = 1; x < editedImage.getWidth() - 1; x++)
            {
                for(int y = 1; y < editedImage.getHeight() - 1; y++)
                {
                    // Initialize RGB values to 0 for each pixel
                    int r = 0, g = 0, b = 0;
                    
                    // Convolve the kernel over the neighboring pixels
                    for(int i = -1; i <= 1; i++)
                    {
                        for(int j = -1; j <= 1; j++)
                        {
                          // Get RGB value of neighboring pixel  
                           int rgb = originalImage.getRGB(x+i, y+i);
                  // Multiply each color component by the corresponding kernel value and accumulate
                           r += ((rgb >> 16) & 0xFF) * kernel[i+1][j+1];
                           g += ((rgb >> 8) & 0xFF) * kernel[i+1][j+1];;
                           b += (rgb & 0xFF) * kernel[i+1][j+1];;
                        }    
                    }
                    
                    // Normalize the accumulated values based on the kernel sum
                    r /= kernelSum; 
                    g /= kernelSum; 
                    b /= kernelSum;
                    
                    // Compose the new RGB value using the blurred color components
                    int newRgb = (r << 16) | (g << 8) | b;
                    // Update the edited image with the new RGB value
                    editedImage.setRGB(x, y, newRgb);
                }
            }
            
            // Update the label displaying the edited image to reflect the changes
            updateImageLabel();
            
        }
    
}
   
    
// create a method that applies the invert colors filter to the editedImage.
private void applyInvertColorsFilter()
{
           // Check if the original image exists
        if(originalImage != null)
        {
            // Loop through all the pixels in the edited image
            for(int x = 0; x < editedImage.getWidth(); x++)
            {
                for(int y = 0; y < editedImage.getHeight(); y++)
                {
                    // Get the RGB color value at the current pixel in the originalImage.
                    int rgb = originalImage.getRGB(x, y);
                    // Extract the red component, invert it, and store it in r.
                    int r = 255 - ((rgb >> 16) & 0xFF);
                    // Extract the green component, invert it, and store it in g.
                    int g = 255 - ((rgb >> 8) & 0xFF);
                    // Extract the blue component, invert it, and store it in b.
                    int b = 255 - (rgb & 0xFF);
                    // Combine the inverted RGB components and set the pixel value in the editedImage.
                    editedImage.setRGB(x, y, (r << 16) | (g << 8) | b);
                }  
            }
            
            // Update the image label to reflect the changes made to the editedImage.
            updateImageLabel();
        }
}


// create a method that applies the edge detection filter
private void applyEdgeDetectionFilter()
{

        // Check if the original image exists
        if(originalImage != null)
        {
            // Define the Sobel operators for x and y directions
            int[][] sobelx = {{-1,0,1},{-2,0,2},{-1,0,1}};
            int[][] sobely = {{1,2,1},{0,0,0},{-1,-2,-1}};
            
            // Create a new BufferedImage to store the grayscale version of the originalImage
            BufferedImage grayImage = new BufferedImage(originalImage.getWidth(), originalImage.getHeight(), BufferedImage.TYPE_BYTE_GRAY);
            Graphics g = grayImage.getGraphics();
            g.drawImage(originalImage, 0, 0, null);
            g.dispose();
            
        // Loop through each pixel of the editedImage (excluding the borders)
            for(int x = 1; x < editedImage.getWidth() - 1; x++)
            {
                for(int y = 1; y < editedImage.getHeight() - 1; y++)
                {
                    // Initialize gx and gy to store the gradient in the x and y directions, respectively
                    int gx = 0, gy = 0;
                    
                    // Apply the Sobel operator to the surrounding pixels of the grayscale image
                    for(int i = -1; i <= 1; i++)
                    {
                        for(int j = -1; j <= 1; j++)
                        {
                          // Get the grayscale value of the pixel
                          int gray = grayImage.getRGB(x + i, y + j) & 0xFF;
                          
                          // Apply the Sobel operator and accumulate the results in gx and gy
                          gx += gray * sobelx[i+1][j + 1];
                          gy += gray * sobely[i+1][j + 1];
                        }
                    }
                    
                    // Calculate the magnitude of the gradient using the Euclidean distance formula
                    int magnitude = (int) Math.sqrt(gx * gx + gy * gy);
                    // Create a new RGB value with the same magnitude for each color component
                    int newRgb = (magnitude << 16) | (magnitude << 8) | magnitude;
                   
                    // Set the newRGB value for the corresponding pixel in the editedImage
                    editedImage.setRGB(x, y, newRgb);
                    
                }
            }
            
            // Update the label displaying the editedImage
            updateImageLabel();
        }
}


    /**
     * @param args the command line arguments
     */
    public static void main(String[] args) {
        
        // use the flatlaf lib to make the app look flat
        try{
            UIManager.setLookAndFeel(new com.formdev.flatlaf.FlatLightLaf());
        }
        catch(Exception ex){
            System.out.println(ex.getMessage());
        }
        
        new PhotoEditorApp();
        
    }

}

                                           
////// OUTPUT : 

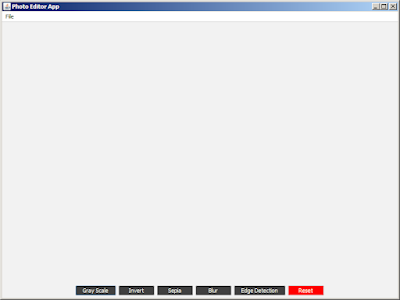
Photo Editor App - Main Form

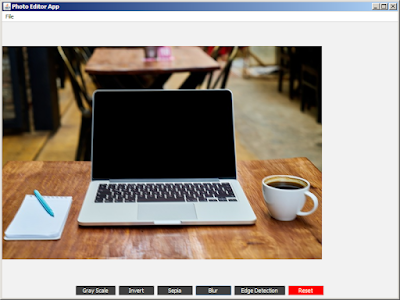
Photo Editor App - Select Image

Photo Editor App - Gray Scale Filter

Photo Editor App - Invert Colors Filter

Photo Editor App - Sepia Filter

Photo Editor App - Blur Filter

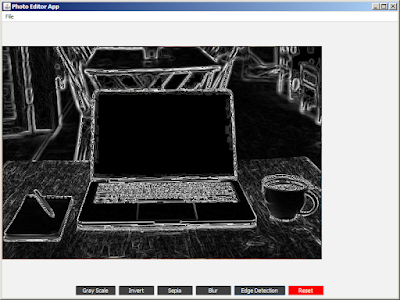
Photo Editor App - Edge Detection Filter

if you want the source code click on the download button below


download the source code


More Java Projects: