How to Create an Expenses and Incomes Tracker In Python Tkinter With MySQL Databse
In this Python tutorial we will create "Expense and Income Tracker" application using the Tkinter library for the graphical user interface (GUI).
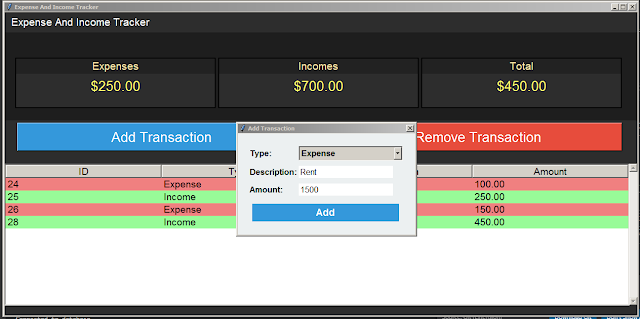
The application allows users to track their expenses and incomes, view the data in a table, and perform operations such as adding a transaction through a dialog with input fields for type, description, and amount.
Removing selected transactions from the table and updating the database.
Dynamically updating the dashboard panels and transaction table based on database changes.
What We Are Gonna Use In This Project:
- Python Programming Language.- Tkinter for GUI.
- MySQL Database.
- VS Code Editor.


- VS Code Editor.
if you want the source code click on the download button below
Project Source Code:
DatabaseConnection Class:
import mysql.connector # pip install mysql-connector-python
class DatabaseConnection:
def __init__(self):
self.DB_NAME = "expense_income_tracker_db"
self.connection = self.getConnection()
def getConnection(self):
try:
# Establish a connection to the MySQL database
connection = mysql.connector.connect(host="localhost",
user="root",
password="",
port="3306",
database = self.DB_NAME
)
print("Connected to database")
return connection
except mysql.connector.Error as err:
print("Connection Error: {}".format(err))
return None
def closeConnection(self):
# Close the database connection
if self.connection:
self.connection.close()
print("Connection Closed")
Transaction Class:
class Transaction:
def __init__(self, _id, _type, description, amount):
self.id = _id
self.type = _type
self.description = description
self.amount = amount
TransactionDAO Class:
import mysql.connector
from DatabaseConnection import DatabaseConnection
from Transaction import Transaction
class TransactionDAO:
#transactions = []
@staticmethod
def get_all_transactions():
#global transactions
transactions = []
# Call the method to obtain the connection
connection = DatabaseConnection().getConnection()
try:
with connection.cursor() as cursor:
# Execute the SQL query to retrieve all transactions
cursor.execute("SELECT * FROM transaction_table")
# Fetch all rows from the results
results = cursor.fetchall()
# Iterate through the result set
for row in results:
# Extract transaction details from the row
_id, transaction_type, _description, _amount = row
# Create a Transaction object with the retrieved details
transaction = Transaction(_id,transaction_type,_description,_amount)
# Add the Transaction object to the list
transactions.append(transaction)
except Exception as ex:
print(f"Error: {ex}")
finally:
# Close the connection after using it
connection.close()
# Return the list of transactions
return transactions
@staticmethod
def insert_transaction(_type, description, amount):
# Validate the amount
try:
amount = float(amount)
if amount <= 0:
print("Error: Amount must be a positive value.")
return
except ValueError:
print("Error: Invalid Amount. Please enter a numeric value.")
return
# Establish a connection to the database
connection = DatabaseConnection().getConnection()
try:
# Create a cursor
with connection.cursor() as cursor:
# Execute the SQL query to insert the transaction
sql = "INSERT INTO `transaction_table`(`transaction_type`,
`description`, `amount`) VALUES (%s,%s,%s)"
values = (_type, description, amount)
cursor.execute(sql, values)
# Commit the transaction
connection.commit()
except expression as ex:
print(f"Error inserting transaction: {ex}")
finally:
# Close the database connection
if connection:
connection.close()
@staticmethod
def delete_transaction(transaction_id):
# Establish a connection to the database
connection = DatabaseConnection().getConnection()
try:
# Create a cursor
with connection.cursor() as cursor:
# Execute the SQL query to delete the transaction by ID
sql = "DELETE FROM `transaction_table` WHERE id = %s"
values = (transaction_id,)
cursor.execute(sql, values)
# Commit the transaction
connection.commit()
except Exception as ex:
print(f"Error Deleting Transaction: {ex}")
finally:
# Close the database connection
if connection:
connection.close()
TransactionValuesCalculation Class:
from TransactionDAO import TransactionDAO
class TransactionValuesCalculation:
@staticmethod
def get_total_value():
# Calculate the total value of all transactions
return sum(transaction.amount for transaction in
TransactionDAO.get_all_transactions())
@staticmethod
def get_total_expenses():
# Calculate the total expenses
return sum(transaction.amount for transaction in
TransactionDAO.get_all_transactions() if transaction.type == "Expense")
@staticmethod
def get_total_incomes():
# Calculate the total incomes
return sum(transaction.amount for transaction in
TransactionDAO.get_all_transactions() if transaction.type == "Income")
ExpenseAndIncomeTrackerApp Class (GUI):
import tkinter as tk
from tkinter import ttk
from tkinter import messagebox
from TransactionDAO import TransactionDAO
from TransactionValuesCalculation import TransactionValuesCalculation
class ExpenseAndIncomeTrackerApp:
def __init__(self):
self.root = tk.Tk()
self.root.title("Expense And Income Tracker")
self.root.geometry("1250x600")
self.root.config(bg="#2d2d2d")
# Initialize variables to keep track of total amount and data panel values
self.total_amount = 0.0
self.data_panel_values = [tk.StringVar(), tk.StringVar(), tk.StringVar()]
self.setup_title_bar()
self.setup_dashboard()
self.populate_data_panels()
self.setup_buttons_panel()
self.setup_transaction_table()
self.populate_table_transaction()
self.root.mainloop()
def setup_title_bar(self):
# Setup the title bar frame
title_bar = tk.Frame(self.root, bg = "#2d2d2d", height=30, bd=0)
title_bar.pack(side="top", fill="x")
# Setup the title bar frame for window dragging
title_bar.bind("<ButtonPress-1>", self.on_drag_start)
title_bar.bind("<B1-Motion>", self.on_drag_motion)
title_label = tk.Label(title_bar, text="Expense And Income Tracker",
font=("Arial", 16), fg="white", bg="#2d2d2d")
title_label.pack(side="left", padx = 10, pady = 5)
def on_drag_start(self, event):
# Start dragging the window
self.is_dragging = True
self.mouse_offset = (event.x, event.y)
def on_drag_motion(self, event):
# Move the window during dragging
if self.is_dragging:
x = self.root.winfo_x() + (event.x - self.mouse_offset[0])
y = self.root.winfo_y() + (event.y - self.mouse_offset[1])
self.root.geometry(f"+{x}+{y}")
def setup_dashboard(self):
# Setup the main dashboard frame
dashboard_frame = tk.Frame(self.root, bg="#1e1e1e")
dashboard_frame.pack(fill=tk.BOTH, expand=True)
# Add data panels to display Expenses, Incomes, and Total
self.add_data_panel(dashboard_frame, "Expenses", "$0.00", 0)
self.add_data_panel(dashboard_frame, "Incomes", "$0.00", 1)
self.add_data_panel(dashboard_frame, "Total", "$0.00", 2)
def add_data_panel(self, parent, title, value, index):
# Add a data panel to the dashboard
data_panel = tk.Frame(parent, bg="#2d2d2d", bd=2, relief="solid")
data_panel.place(x = len(parent.winfo_children()) + 20 + index * 400, y = 50,
width = 396, height = 100)
# Add title label to the data panel
title_label = tk.Label(data_panel, text = title, font = ("Arial", 16),
fg = "#ffeaa7", bg = "#222")
title_label.pack(fill="x", pady = 0)
# Add value label to the data panel
value_label = tk.Label(data_panel, textvariable = self.data_panel_values[index]
, font = ("Arial", 20), fg = "#fffa65", bg = "#2d2d2d")
value_label.pack(fill = "x", pady = 5)
def populate_data_panels(self):
# Calculate and display the values in data panels
#total_amount = TransactionValuesCalculation.get_total_value()
total_expenses = TransactionValuesCalculation.get_total_expenses()
total_incomes = TransactionValuesCalculation.get_total_incomes()
total_net = total_incomes - total_expenses
formatted_total_net = self.fix_negative_value_display(f"${total_net:,.2f}")
self.data_panel_values[0].set(f"${total_expenses:,.2f}")
self.data_panel_values[1].set(f"${total_incomes:,.2f}")
self.data_panel_values[2].set(formatted_total_net)
def fix_negative_value_display(self, value):
# Fix the display format for negative values
if value.startswith("$-"):
numeric_part = value[2:]
return f"-${numeric_part}"
return value
def setup_buttons_panel(self):
# Setup the buttons panel for Add Transaction and Remove Transaction
buttons_panel = tk.Frame(self.root, bg="#2d2d2d")
buttons_panel.pack(side="top", fill="x", pady=5)
# Add Transaction button
add_transaction_button = tk.Button(buttons_panel, text="Add Transaction",
bg="#3498db", fg="white",
font=("Arial", 20), width=35,
command=self.show_add_transaction_dialog)
add_transaction_button.grid(row=0, column=0, padx=25)
# Remove Transaction button
remove_transaction_button = tk.Button(buttons_panel, text="Remove Transaction",
bg="#e74c3c", fg="white",
font=("Arial", 20), width=35,
command=self.remove_selected_transaction)
remove_transaction_button.grid(row=0, column=1, padx=30)
def setup_transaction_table(self):
# Setup the transaction table using ttk.Treeview
columns = ["ID", "Type", "Description", "Amount"]
self.table_model = ttk.Treeview(self.root, columns = columns, show="headings",
height=10)
for col in columns:
self.table_model.heading(col, text=col)
self.configure_transaction_table()
# Add a vertical scrollbar to the transaction table
scrollbar = ttk.Scrollbar(self.root, orient="vertical",
command=self.table_model.yview)
scrollbar.pack(side="right", fill="y", pady=(20, 20))
self.table_model.configure(yscrollcommand=scrollbar.set)
# Pack the ttk.Treeview for the transaction table
self.table_model.pack(side="left", fill="both", expand=True)
def configure_transaction_table(self):
# Configure options for the transaction table
self.table_model["selectmode"] = "browse"
self.table_model.pack(side="left", fill="both", pady=20)
# Configure tags for different transaction types and set font styles
self.table_model.tag_configure("Income", background="pale green")
self.table_model.tag_configure("Expense", background="light coral")
style = ttk.Style()
style.configure("Treeview", rowheight = 25)
style.configure("Treeview", font = ("Arial", 14))
style.configure("Treeview.Heading", font = ("Arial", 14))
# Bind the select event to the on_select function
self.table_model.bind("<<TreeviewSelect>>", self.on_select)
# Style for selected row background
style.map("Treeview", background = [("selected","grey")])
# Style for selected row foreground
style.map("Treeview", foreground=[("selected", "white")])
def on_select(self, event):
# Get the item currently selected in the Treeview
selected_item = self.table_model.selection()
# Iterate through all items in the Treeview
for item in self.table_model.get_children():
# Check if the item is the currently selected item
if item == selected_item:
# If the item is selected, apply the 'selected'
# tag to change its appearance
self.table_model.item(item, tags=("selected",))
def populate_table_transaction(self):
# Populate the transaction table with data from the database
for transaction in TransactionDAO.get_all_transactions():
self.table_model.insert("", "end", values = [transaction.id,
transaction.type, transaction.description,
transaction.amount], tags = (transaction.type,) )
def show_add_transaction_dialog(self):
# Show the Add Transaction dialog
dialog = tk.Toplevel(self.root)
dialog.title("Add Transaction")
dialog.geometry("350x200")
dialog.transient(self.root)
dialog.grab_set()
# Setup the Add Transaction dialog
self.setup_add_transaction_dialog(dialog)
def setup_add_transaction_dialog(self, dialog):
# Setup the components for the Add Transaction dialog
dialog_panel = tk.Frame(dialog, padx = 20, pady = 20, bg = "#ecf0f1")
dialog_panel.pack(expand = True, fill = tk.BOTH)
type_label = tk.Label(dialog_panel, text="Type:", bg="#ecf0f1", font=("Arial",
12, "bold"))
type_label.grid(row = 0, column = 0, sticky = "w", pady = 5)
type_combobox = ttk.Combobox(dialog_panel, values=["Expense", "Income"],
font=("Arial", 12, "bold"), state = "readonly")
type_combobox.set("Expense")
type_combobox.grid(row = 0, column = 1, sticky = "w", pady = 5)
discription_label = tk.Label(dialog_panel, text="Description:", bg="#ecf0f1",
font=("Arial", 12, "bold"))
discription_label.grid(row = 1, column = 0, sticky = "w", pady = 5)
description_entry = tk.Entry(dialog_panel, font=("Arial", 12), bd=2,
relief="flat")
description_entry.grid(row = 1, column = 1, sticky = "w", pady = 5)
amount_label = tk.Label(dialog_panel, text="Amount:", bg="#ecf0f1",
font=("Arial", 12, "bold"))
amount_label.grid(row = 2, column = 0, sticky = "w", pady = 5)
amount_entry = tk.Entry(dialog_panel, font=("Arial", 12), bd=2, relief="flat")
amount_entry.grid(row = 2, column = 1, sticky = "w", pady = 5)
add_button = tk.Button(dialog_panel, text="Add", bg = "#3498db", fg = "white",
font=("Arial", 14, "bold"), bd=0, relief="flat",
activebackground="#2980b9", width="22",
command = lambda:self.add_transaction(type_combobox,
description_entry, amount_entry, dialog)
)
add_button.grid(row=3, column=0, columnspan=2, pady=10, ipadx=10)
# Center the dialog relative to the screen
self.center_dialog(dialog)
def center_dialog(self, dialog):
# Set the size of the dialog
dialog_width = 350
dialog_height = 200
# Get the screen width and height
screen_width = dialog.winfo_screenwidth()
screen_height = dialog.winfo_screenheight()
# Calculate the position to center the dialog
x_position = (screen_width - dialog_width) // 2
y_position = (screen_height - dialog_height) // 2
# Set the geometry of the dialog
dialog.geometry(f"{dialog_width}x{dialog_height}+{x_position}+{y_position}")
def add_transaction(self, type_combobox, description_entry, amount_entry, dialog):
# Add a new transaction to the database
try:
transaction_type = type_combobox.get()
description = description_entry.get()
amount = float(amount_entry.get())
if amount <= 0:
tk.messagebox.showerror("Invalid amount",
"Error: Amount must be a positive value.")
else:
TransactionDAO.insert_transaction(transaction_type, description,
amount)
self.table_model.delete(*self.table_model.get_children())
self.populate_table_transaction()
self.populate_data_panels()
dialog.destroy()
except ValueError:
tk.messagebox.showerror("Error", "Invalid amount")
def remove_selected_transaction(self):
# Remove the selected transaction from the database
selected_row = self.table_model.selection()
if selected_row:
transaction_id = int(self.table_model.item(selected_row, "values")[0])
TransactionDAO.delete_transaction(transaction_id)
self.populate_data_panels()
self.table_model.delete(selected_row)
else:
tk.messagebox.showerror("Error",
"Please select a transaction from the table")
if __name__ == "__main__":
ExpenseAndIncomeTrackerApp()
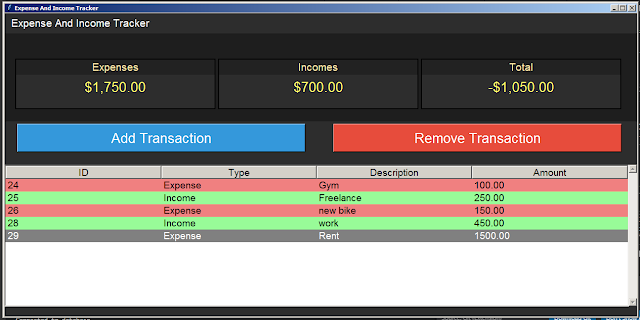
The Final Result:
if you want the source code click on the download button below


