C# Design Form Using Panels

How To Design a Form With Panels In C#

Design Form With Panels In C#


In Another C# Design Tutorial We Did a Nice Looking Login Form Design .
And In this C# Tutorial we will see How To Create a Simple Form Design Using Panels and Labels Controls In C# And Visual Studio Editor .


WATCH THIS C# TUTORIAL


Project Source Code:


using System;
using System.Collections.Generic;
using System.ComponentModel;
using System.Data;
using System.Drawing;
using System.Linq;
using System.Text;
using System.Threading.Tasks;
using System.Windows.Forms;

namespace Csharp_Tutorials
{
    public partial class Design_Form_Using_Panels : Form
    {
        public Design_Form_Using_Panels()
        {
            InitializeComponent();
        }


        // create color vars
        Color p1_color;
        Color p2_color;
        Color p3_color;

        private void Design_Form_Using_Panels_Load(object sender, EventArgs e)
        {

           // get the panels color
            p1_color = panel1.BackColor;
            p2_color = panel2.BackColor;
            p3_color = panel3.BackColor;

        }

        private void label1_MouseEnter(object sender, EventArgs e)
        {
            // set the panel color to white
            panel1.BackColor = Color.White;

            // set the label forcolor to the panel color
            label1.ForeColor = p1_color;
        }

        private void label1_MouseLeave(object sender, EventArgs e)
        {
            panel1.BackColor = p1_color;
            label1.ForeColor = Color.White;
        }

//******* We Will Do The Same For The Other Elements *******//

        private void label2_MouseEnter(object sender, EventArgs e)
        {
            panel2.BackColor = Color.White;
            label2.ForeColor = p2_color;
        }

        private void label2_MouseLeave(object sender, EventArgs e)
        {
            panel2.BackColor = p2_color;
            label2.ForeColor = Color.White;
        }

        private void label3_MouseEnter(object sender, EventArgs e)
        {
            panel3.BackColor = Color.White;
            label3.ForeColor = p3_color;
        }

        private void label3_MouseLeave(object sender, EventArgs e)
        {
            panel3.BackColor = p3_color;
            label3.ForeColor = Color.White;
        }


    }
}


OUTPUT:


How To Design a Form With Panels Using C#


Connect Java To MySQL Using DataSource

How To Connect Java To MySQL Database Using DataSource In NetBeans

Connect Java To MySQL Database


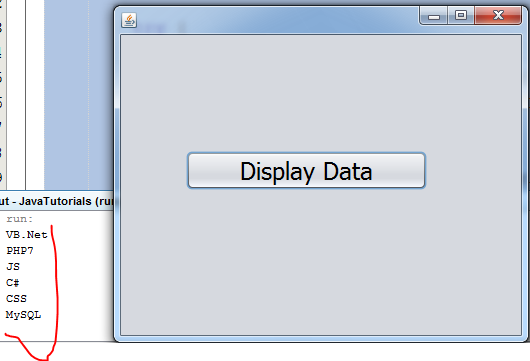
In this Java Tutorial we will see How To Create a Connection Between Java NetBeans and MySQL Database Using Datasource And Display Data From Database .


WATCH THIS JAVA TUTORIAL

downloads connector:  http://dev.mysql.com/downloads/connector/j

Project Source Code:

// package to import
import com.mysql.jdbc.jdbc2.optional.MysqlDataSource;
import java.sql.Connection;
import java.sql.ResultSet;
import java.sql.SQLException;
import java.sql.Statement;
import java.util.logging.Level;
import java.util.logging.Logger;

// make sure to add a jar connector to your project ( watch the video )
    // create a connection with mysql
    public Connection createConnection(String serverName, Integer portNumber, String userName, String password, String dbName){
        
        
        Connection myConnection = null;
        
// create a datasource 
        MysqlDataSource datasource = new MysqlDataSource();
        
        datasource.setServerName(serverName);
        datasource.setPortNumber(portNumber);
        datasource.setUser(userName);
        datasource.setPassword(password);
        datasource.setDatabaseName(dbName);
        
        try {
            myConnection = datasource.getConnection();
        } catch (SQLException ex) {
            Logger.getLogger(Connect_To_MySQL.class.getName()).log(Level.SEVERE, null, ex);
        }
        
        return myConnection;
    }


// button to display data from mysql database
    private void jButton_Display_ActionPerformed(java.awt.event.ActionEvent evt) {                                                 
        
        Connection connection = createConnection("localhost", 3306, "root", "", "student_db");
        
        Statement st;
        ResultSet rs;
        
        try {
            
            st = connection.createStatement();
            rs = st.executeQuery("SELECT * FROM `course`");
            
            while(rs.next()){
                System.out.println(rs.getString("label"));
            }
            rs.close();
            st.close();
        } catch (SQLException ex) {
            Logger.getLogger(Connect_To_MySQL.class.getName()).log(Level.SEVERE, null, ex);
        }
        
    }                                                

OutPut:

connect java to mysql database using datasource in netbeans


Python - How To Bind a Combobox With Mysql Database Values In Python Tkinter

Python - How To Bind a Combobox With Mysql Database Values In Python Tkinter


How To Bind a Combobox With Mysql Database Values In Python Tkinter


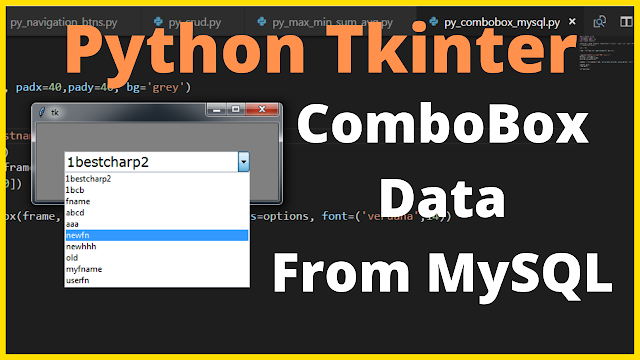
In This Python Code We Will See How To To Populate A ComboBox With MySQL DataBase Data In Python Programming Language.


Project Source Code:

import tkinter as tk
from tkinter import *
from tkinter import ttk
import mysql.connector

connection = mysql.connector.connect(host='localhost', user='root', port='3306',
password='', database='test_py')
c = connection.cursor()

root = Tk()

frame = tk.Frame(root, padx=40,pady=40, bg='grey')


c.execute("SELECT firstname FROM `users_2`")
options = c.fetchall()
selected = StringVar(frame)
selected.set(options[0])

combobox = ttk.Combobox(frame, textvariable=selected, values=options,
font=('verdana',14))

combobox.pack()
frame.pack()

root.mainloop()


Retrieving Data from the Database:
The code executes an SQL query to select the "firstname" column from the "users_2" table in the connected database. The results are stored in the "options" variable.

Creating the Combobox:
A ttk.Combobox widget is created within the frame. 
The textvariable parameter is set to a StringVar instance named "selected," which will hold the selected option from the combobox. 
The values parameter is set to the retrieved options from the database. 
The font parameter specifies the font style and size.

Displaying the Combobox:
The combobox widget is packed within the frame, causing it to be displayed in the application window.

OutPut:

How To Populate a Combobox With Mysql Database Values In Python Tkinter


Javascript - Create a Digital Clock

How To Make a Digital Clock Using Javascript  


Create a Digital Clock in Javascript


In This Javascript Tutorial we will See How To build a digital clock using JavaScript. 
The clock updates automatically every second, providing an interactive and dynamic experience for the users. 
Feel free to customize the styling or integrate the clock into your own web projects. Remember to experiment with the code and explore additional features you can add to enhance the clock's functionality . 


Project Source Code:

    
<!DOCTYPE html>
<html>
<head>
<title>Digital Clock</title>

<style>
#clock{
display: block;
width: 40%;
margin: 10px auto;
padding: 10px;
background-color: #3c3c3c;
color: #fff;
font-size: 36px;
font-family: Arial, sans-serif;
text-align: center;
border-radius: 5px;
box-shadow: 0px 5px 10px rgba(0, 0, 0, 0.5);
}

</style>


</head>
<body>

<div id="clock"></div>

<script>

function updateClock()
{
// get the current time
var currentTime = new Date();
// get the hours, minutes, and seconds from the
// current time
var hours = currentTime.getHours();
var minutes = currentTime.getMinutes();
var seconds = currentTime.getSeconds();
// format the hours, minutes,
// and seconds to always display two digits
if(hours < 10) { hours = "0" + hours; }

if(minutes < 10) { minutes = "0" + minutes; }

if(seconds < 10) { seconds = "0" + seconds; }

// get the clock div
var clockDiv = document.getElementById("clock");

// update the clock div with the current time
clockDiv.innerHTML = hours + ":" + minutes + ":" + seconds;

}

// calls the updateClock() function every 1000 milliseconds
// (or 1 second)
setInterval(updateClock, 1000);

</script>

</body>
</html>


Code Explanation:

This JavaScript code consists of a function called updateClock(), which is responsible for fetching the current time, formatting it, and updating the clock display on the webpage. Let's break down the code to understand its functionality.

Fetching Current Time: The updateClock() function starts by creating a new Date object called currentTime, which holds the current date and time. 

Extracting Hours, Minutes, and Seconds: Next, the code extracts the hours, minutes, and seconds from the currentTime object using the getHours(), getMinutes(), and getSeconds() methods, respectively.

Formatting Time: To ensure that the hours, minutes, and seconds are always displayed with two digits, the code checks if any of them are less than 10. If so, a leading zero is added to the value using simple conditional statements. 

Updating the Clock Display: The code retrieves the clock element from the webpage using the getElementById() method and assigns it to the clockDiv variable. Then, it updates the innerHTML property of the clockDiv with the formatted time (hours, minutes, and seconds). 

Automatic Clock Update: To make the clock update every second, the code employs the setInterval() function. It calls the updateClock() function every 1000 milliseconds (1 second), ensuring that the displayed time is always accurate and up to date.


OUTPUT:


Digital Clock Using Javascript


C# - Calculate Percentage With MySQL

Calculating the Percentage of Male and Female Students from a MySQL Database Using C#

Calculate Percentage In C#


In this C# tutorial, we will learn how to calculate and display the percentage values from a MySQL database table in C# using Visual Studio editor.

We will create two classes:
1- "MY_DB": This class will handle the connection with the MySQL database.
2- "MY_CALC": This class will be responsible for counting the values we need.

Additionally, we will have a form named "calculate_percentage" to display the percentage values.


WATCH THIS C# TUTORIAL


Project Source Code:


//************** Start MY_DB Class **************//

using System;
using System.Collections.Generic;
using System.Linq;
using System.Text;
using System.Threading.Tasks;
using MySql.Data.MySqlClient;
using System.Data;

namespace csharp__calculate_percentage
{
    class My_DB
    {

        // the connection
        MySqlConnection con = new MySqlConnection("datasource=localhost;port=3306;username=root;password=;database=student_db");

        // get the connection
        public MySqlConnection getConnection
        {
            get
            {
                return con;
            }
        }


        // open the connection
        public void openConnection()
        {
            if ((con.State == ConnectionState.Closed))
            {
                con.Open();
            }

        }


        // close the connection
        public void closeConnection()
        {
            if ((con.State == ConnectionState.Open))
            {
                con.Close();
            }

        }
    }
}


//************** End MY_DB Class **************// 


//************** Start MY_CALC Class **************// 

using System;
using System.Collections.Generic;
using System.Linq;
using System.Text;
using System.Threading.Tasks;
using MySql.Data.MySqlClient;

namespace csharp__calculate_percentage
{
    class My_CALC
    {
        My_DB db = new My_DB();

        // function to execute count query
        string execCount(string query)
        {
            MySqlCommand command = new MySqlCommand(query, db.getConnection);
            db.openConnection();

            string count = command.ExecuteScalar().ToString();
            db.closeConnection();

            return count;
        }

        // function to return the total students count in the database
        public string totalStudents()
        {
            return execCount("SELECT COUNT(*) FROM `student`");
        }

        // function to return the total MALE students count in the database
        public string totalMaleStudents()
        {
            return execCount("SELECT COUNT(*) FROM `student` WHERE gender = 'MALE'");
        }

        // function to return the total FEMALE students count in the database
        public string totalFemaleStudents()
        {
            return execCount("SELECT COUNT(*) FROM `student` WHERE gender = 'FEMALE'");
        }
    }
}


//************** End MY_CALC Class **************// 


//************** Start calculate_percentage Form **************// 
using System;
using System.Collections.Generic;
using System.Linq;
using System.Text;
using System.Threading.Tasks;
using MySql.Data.MySqlClient;

namespace csharp__calculate_percentage
{
    class My_CALC
    {
        My_DB db = new My_DB();

        // function to execute count query
        string execCount(string query)
        {
            MySqlCommand command = new MySqlCommand(query, db.getConnection);
            db.openConnection();

            string count = command.ExecuteScalar().ToString();
            db.closeConnection();

            return count;
        }

        // function to return the total students count in the database
        public string totalStudents()
        {
            return execCount("SELECT COUNT(*) FROM `student`");
        }

        // function to return the total MALE students count in the database
        public string totalMaleStudents()
        {
            return execCount("SELECT COUNT(*) FROM `student` WHERE gender = 'MALE'");
        }

        // function to return the total FEMALE students count in the database
        public string totalFemaleStudents()
        {
            return execCount("SELECT COUNT(*) FROM `student` WHERE gender = 'FEMALE'");
        }
    }
}

//************** End calculate_percentage Form **************// 


OUTPUT:


How To Calculate Percentage From MySQL In C#