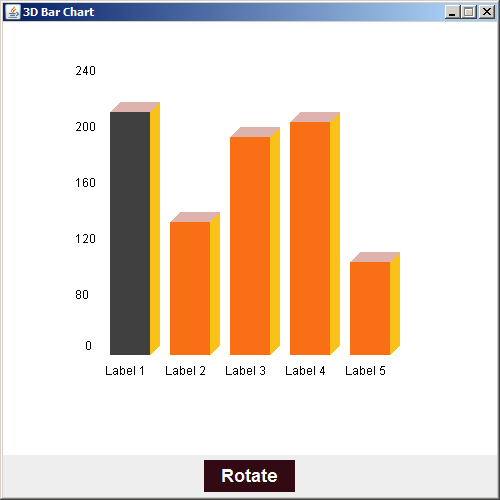
Java Create 3D Bar Chart

How to Create a Custom 3D Bar Chart In Java Netbeans


In this Java Tutorial we will see How To Create a Custom 3D Bar Chart from scratch using graphics class in java netbeans.
Note: The code generates random bar heights for demonstration purposes. 
In a real-world scenario, you would replace the random heights with actual data values for a meaningful representation of the chart.

What We Are Gonna Use In This Project:

- Java Programming Language.
- NetBeans Editor.


Project Source Code:


package threedbarchart;

import java.awt.BorderLayout;
import java.awt.Color;
import java.awt.Font;
import java.awt.Graphics;
import java.awt.Polygon;
import javax.swing.JButton;
import javax.swing.JFrame;
import javax.swing.JPanel;

/**
 *
 * @author 1BestCsharp
 */
public class ThreeDBarChart extends JFrame {

    private ThreeDBarChartPanel chartPanel;
    
    public ThreeDBarChart()
    {
        setTitle("3D Bar Chart");
        setDefaultCloseOperation(JFrame.EXIT_ON_CLOSE);
        setSize(500,500);
        setLocationRelativeTo(null);
        setResizable(false);
        
        chartPanel = new ThreeDBarChartPanel();
        getContentPane().add(chartPanel, BorderLayout.CENTER);
        
        JButton rotateButton = new JButton("Rotate");
        rotateButton.setBorderPainted(false);
        rotateButton.setFocusPainted(false);
        rotateButton.setBackground(new Color(50,10,20));
        rotateButton.setForeground(Color.white);
        rotateButton.setFont(new Font("Arial", Font.BOLD, 18));
        
        rotateButton.addActionListener((e) -> {
           
            chartPanel.rotateChart();
            
        });
        
        
        JPanel controlPanel = new JPanel();
        controlPanel.add(rotateButton);
        getContentPane().add(controlPanel, BorderLayout.SOUTH);
        
    }
    
    
    /**
     * @param args the command line arguments
     */
    public static void main(String[] args) {
        
        new ThreeDBarChart().setVisible(true);
        
    }

}


class ThreeDBarChartPanel extends JPanel
{
    // Define RGB color codes
    Color colorSideFace = new Color(248,111,21);
    Color colorTopFace = new Color(250,194,24);
    Color colorFrontFace = new Color(222,179,173);
  

    public void rotateChart()
    {
        repaint();
    }
    
    @Override
    protected void paintComponent(Graphics g)
    {
        super.paintComponent(g);
        
        int width = getWidth();
        int height = getHeight();
        
        // Clear the panel
        g.setColor(Color.white);
        g.fillRect(0, 0, width, height);
        
        g.setColor(Color.darkGray);
        
        // Calculate the number of bars and their dimensions
        int numBars = 5;
        int barWidth = 40;
        int barSpacing = 20;
        int baseX = (width - (numBars * (barWidth + barSpacing) - barSpacing))/2;
        int baseY = height - 100;
        
        // Draw 3D bars
        for(int i = 0; i < numBars; i++)
        {
            int x = baseX + i * (barWidth + barSpacing);
            // Random heights for demonstration
            int barheight = (int) (Math.random() * 200)+50;
            // Depth of the bars
            int z = 10;
            // Draw the front face
            g.fillRect(x, baseY - barheight, barWidth, barheight);
            g.setColor(colorFrontFace);
            
            // Draw the top face
            Polygon topFace = new Polygon();
            topFace.addPoint(x, baseY - barheight);
            topFace.addPoint(x + barWidth, baseY - barheight);
            topFace.addPoint(x + barWidth + z, baseY - barheight - z);
            topFace.addPoint(x + z, baseY - barheight - z);
            
            g.fillPolygon(topFace);
            g.setColor(colorTopFace);
            
            // Draw the side face
            Polygon sideFace = new Polygon();
            sideFace.addPoint(x + barWidth, baseY - barheight);
            sideFace.addPoint(x + barWidth, baseY);
            sideFace.addPoint(x + barWidth + z, baseY - z);
            sideFace.addPoint(x + barWidth + z, baseY - barheight - z);
            
            g.fillPolygon(sideFace);
            g.setColor(colorSideFace);
            
        }
        
        // Draw horizontal axis labels
        int axisLabelX = baseX - 5;
        int axisLabelY = baseY + 20;
        g.setColor(Color.black);
        
        g.drawString("Label 1", axisLabelX, axisLabelY);
        g.drawString("Label 2", axisLabelX + barWidth + barSpacing, axisLabelY);
        g.drawString("Label 3", axisLabelX + 2 * (barWidth + barSpacing), axisLabelY);
        g.drawString("Label 4", axisLabelX + 3 * (barWidth + barSpacing), axisLabelY);
        g.drawString("Label 5", axisLabelX + 4 * (barWidth + barSpacing), axisLabelY);
        
        // Draw vertical axis labels
        int numTicks = 5;
        int tickSpacing = (baseY - 50) / numTicks;
        g.drawString("0", axisLabelX - 20, baseY - 5);
        
        for(int i = 1; i <= numTicks; i++)
        {
            int tickValue = 40 + i * 40;
            g.drawString(Integer.toString(tickValue), axisLabelX-30, baseY-i*tickSpacing);
        }
        
        g.drawString("", axisLabelX-60, height/2);
        
    }
    
}


The Final Result:


if you want the source code click on the download button below


JavaScript - Create Image Rating Page with JavaScript and CSS

How to Create Star Ratings for Images Using HTML, CSS, and JavaScript


In this Javascript tutorial, we will see how to create an HTML page that displays an image and allows users to rate it.
When a user clicks on a star to rate an image, it visually highlights the selected stars in yellow and dims the unselected stars.


Project Source Code:


<!DOCTYPE html>
<html>
<head>
<title>View Image</title>
<!-- fontawesome -->
<link rel="stylesheet"
href="https://cdnjs.cloudflare.com/ajax/libs/font-awesome/5.15.4/css/all.min.css">

<style>
*{ box-sizing: border-box; margin: 0; padding: 0; color: #fff; }

body{ font-family: Arial, Helvetica, sans-serif; color: #333; background-color: #f2f2f2; }

.container{ max-width: 600px; margin: 20px auto; padding: 20px; background-color: #b33939;
border-radius: 5px; border: 2px solid #fff;
box-shadow: 0 0 10px rgba(0, 0, 0, 0.3);
}

h1{ font-size: 36px; font-weight: 600; margin-bottom: 20px; text-align: center; }

.image-wrapper{ position: relative; widows: 100%; padding-bottom: 60%; margin-bottom: 20px;
border-radius: 10px; box-shadow: 0 0 10px rgba(0, 0, 0, 0.3);
}

.image-wrapper img{ position: absolute; top: 0; left: 0; width: 100%; height: 100%;
object-fit: cover;
}

.overlay{ position: absolute; bottom: 0; left: 0; width: 100%;
padding: 10px; background-color: rgba(0, 0, 0, 0.2); color: #fff;
}

.overlay h3{ text-decoration: underline; margin-bottom: 5px; }

.rating-wrapper{ margin-bottom: 20px; }

.rating-wrapper h3{ font-size: 20px; margin-bottom: 10px; }

.rating-stars{ display: flex; align-items: center; }

.rating-stars input[type="radio"]{ display: none; }

.rating-stars label{ cursor: pointer; color: #333; font-size: 30px; margin-right: 10px; }

.rating-stars label:before{ content: '\2605'; }

.rating-stars label:hover{ color: #f1c40f; }

.rating{ display: flex; align-items: center; }

.stars{ display: inline-block; font-size: 3em; }

.stars::before{ content: '\2605'; color: #f1c40f; }

.rating-value{ margin-left: 0.5em; font-weight: bold; letter-spacing: .05em; }

@media only screen and (max-width:768px){

.container{ max-width: 90%; margin: 20px auto; padding: 10px; }

h1{ font-size: 24px; margin-bottom: 10px; }

.image-wrapper{ padding-bottom: 100%; margin-bottom: 10px; }

.overlay{ padding: 5px; }

.rating-wrapper h3{ font-size: 16px; margin-bottom: 5px; }

.rating-stars label{ font-size: 20px; margin-right: 5px; }

}

</style>

</head>
<body>

<!-- image link = https://pixabay.com/photos/morocco-city-historic-village-clay-2349647/ -->
<div class="container">
<h1>Historic Village</h1>
<div class="image-wrapper">
<img src="images/village.jpg" alt="village image">
<div class="overlay">
<h3>Morocco Historic Village</h3>
<p>
village Ait Benhaddou, located in the southern part of the country.
This UNESCO World Heritage Site is a stunning example
of Moroccan architecture, with its fortified walls and kasbahs
(traditional Moroccan houses).
</p>
</div>
</div>

<form action="#" class="rating-wrapper">
<h3>Rate This Image</h3>
<div class="rating">
<span class="stars"></span>
<span class="rating-value">4/5</span>
</div>
<div class="rating-stars">
<input type="radio" name="rating1" id="star1" value="1">
<label for="star1"></label>

<input type="radio" name="rating2" id="star2" value="2">
<label for="star2"></label>

<input type="radio" name="rating3" id="star3" value="3">
<label for="star3"></label>

<input type="radio" name="rating4" id="star4" value="4">
<label for="star4"></label>

<input type="radio" name="rating5" id="star5" value="5">
<label for="star5"></label>
</div>

</form>

</div>

<script>
// Get all input elements with type="radio" that are inside an element with the class "rating-stars"
const stars = document.querySelectorAll('.rating-stars input[type="radio"]');

// Attach a click event listener to each input element
stars.forEach((s)=>{
s.addEventListener('click',() => {

// Get the value of the clicked input element
const rating = s.value;

console.log(rating);

// Change the color of the labels of the first 'rating' stars to yellow (#ffc107)
for(let i = 1; i <= rating; i++)
{
document.querySelector(`#star${i} + label`).style.color = "#ffc107";
}

// Change the color of the labels of the remaining stars to gray (#333)
for(let i = parseInt(rating) + 1; i <= 5; i++)
{
document.querySelector(`#star${i} + label`).style.color = "#333";
}
});

});


</script>

</body>
</html>


Code Explanation:

This JavaScript code displays an image and allows users to rate it by selecting stars.

This JavaScript code performs the following actions:

1 - Selecting Elements: It selects all "radio" input elements within elements having the class "rating-stars".

2 - Event Listeners: It attaches a click event listener to each of these radio input elements.

3 - Event Handling: When a radio input is clicked (indicating a user's rating), it gets the value of the clicked input element (which corresponds to the rating).

4 - Coloring Stars: It changes the color of the labels of the first 'rating' stars to yellow (#ffc107) when a user selects a rating, and it sets the color of the labels of the remaining stars to gray (#333).


OUTPUT:


if you want the source code click on the download button below


Java Bouncing Ball

How to Create a Bouncing Ball Animation In Java Netbeans

How to Create a Bouncing Ball Animation In Java Netbeans


In this Java Tutorial we will see How To Create a basic graphical application where a ball moves within a panel, bouncing off its borders. 
The animation is achieved through a timer that updates the ball's position and triggers the repainting of the panel at regular intervals.

What We Are Gonna Use In This Project:

- Java Programming Language.
- NetBeans Editor.


Project Source Code:


package new_tutorials;

import java.awt.Color;
import java.awt.Graphics;
import java.awt.Graphics2D;
import java.awt.RenderingHints;
import javax.swing.JFrame;
import javax.swing.JPanel;
import javax.swing.Timer;

/**
 *
 * @author 1BestCsharp
 */
public class BouncingBall extends JPanel {

    private int ballX = 50; // Initial X coordinate of the ball
    private int ballY = 50; // Initial Y coordinate of the ball
    private int ballSpeedX = 2; // Speed of the ball in the X direction
    private int ballSpeedY = 2; // Speed of the ball in the Y direction
    private int ballSize = 100; // Size of the ball
    
    public BouncingBall(){
        // Set up a timer to update the game state every 10 milliseconds
        Timer timer = new Timer(10, ((e) -> {
            updatePanelState();
            repaint();
        }));
        
        timer.start();
    }
    
    private void updatePanelState()
    {
        // Update the position of the ball
        ballX += ballSpeedX;
        ballY += ballSpeedY;
        
        // Check if the ball hits the borders of the panel
        if(ballX <= 0 || ballX >= getWidth() - ballSize)
        {
            ballSpeedX *= -1; // Reverse the X direction
        }
        
        if(ballY <= 0 || ballY >= getHeight() - ballSize)
        {
            ballSpeedY *= -1; // Reverse the Y direction
        }
    }
    
    
    @Override
    protected void paintComponent(Graphics g)
    {
        super.paintComponent(g);
        // Draw the ball
        Graphics2D g2d = (Graphics2D) g;
        g2d.setColor(Color.ORANGE);
        g2d.setRenderingHint(RenderingHints.KEY_ANTIALIASING, RenderingHints.VALUE_ANTIALIAS_ON);
        g2d.fillOval(ballX, ballY, ballSize, ballSize);
    }
    
    
    public static void main(String[] args) {
        JFrame frame = new JFrame("Bouncing Ball");
        BouncingBall panel = new BouncingBall();
        panel.setBackground(Color.BLACK);
        frame.add(panel);
        frame.setSize(800,500);
        frame.setDefaultCloseOperation(JFrame.EXIT_ON_CLOSE);
        frame.setLocationRelativeTo(null);
        frame.setVisible(true);
    }
    
}


The Final Result:

Java Bouncing Ball 1

Java Bouncing Ball 2

Java Bouncing Ball 3