How to Create Login and Register Form in Python Tkinter with MySQL Database
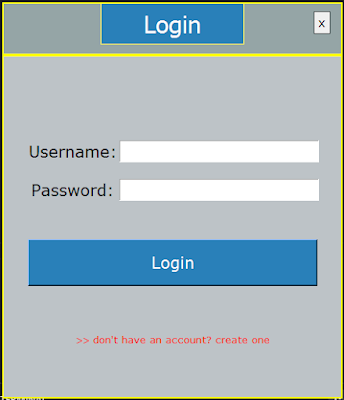
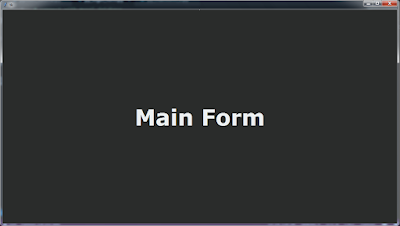
In this Python Long Tutorial we will go step by step on How To Design a Login Form And a Register Form, plus how to make a basic main form / dashboard to show to the user after
successfully logging.
What We Are Gonna Use In This Project:
- Python Programming Language.- Tkinter for Graphical User interfaces.
- VsCode Editor.
- MySQL Database.
- PhpMyAdmin.
- Design Two Forms For The Login and Signup Using Frames.
- Create Close Button To Close The Form.
- Connect Python To MySQL Database, To Add The Registred User Data In The Signup Form or to Check If The User Exist In The Login Form.
- Browse and Select Image From Your Computer and Set The File Path In a Label .
- Check If The User Leave Some Fields Empty.
- Check If The User Enter Username That Already Exists.
- Check If The User Enter a Wrong Password In The Confirmation Field.
- VsCode Editor.
- MySQL Database.
- PhpMyAdmin.
What We Will Do In This Project:
- Design Two Forms For The Login and Signup Using Frames.
- Create Close Button To Close The Form.
- Connect Python To MySQL Database, To Add The Registred User Data In The Signup Form or to Check If The User Exist In The Login Form.
- Browse and Select Image From Your Computer and Set The File Path In a Label .
- Check If The User Leave Some Fields Empty.
- Check If The User Enter Username That Already Exists.
- Check If The User Enter a Wrong Password In The Confirmation Field.
Project Source Code:
import tkinter as tk
from tkinter import *
from tkinter import ttk
from tkinter.ttk import *
from tkinter import filedialog
from tkinter import messagebox
import mysql.connector
from py_mainform import mainform
root = Tk()
connection = mysql.connector.connect(host='localhost', user='root', port='3306',
password='', database='py_lg_rg_db')
c = connection.cursor()
# width and height
w = 450
h = 525
# background color
bgcolor = "#bdc3c7"
# ----------- CENTER FORM ------------- #
root.overrideredirect(1) # remove border
ws = root.winfo_screenwidth()
hs = root.winfo_screenheight()
x = (ws-w)/2
y = (hs-h)/2
root.geometry("%dx%d+%d+%d" % (w, h, x, y))
# ----------- HEADER ------------- #
headerframe = tk.Frame(root, highlightbackgroun='yellow', highlightcolor='yellow',
highlightthickness=2, bg='#95a5a6', width=w, height=70)
titleframe = tk.Frame(headerframe, bg='yellow', padx=1, pady=1)
title_label = tk.Label(titleframe, text='Register', padx=20, pady=5, bg='green',
fg='#fff', font=('Tahoma',24), width=8)
close_button = tk.Button(headerframe, text='x', borderwidth=1, relief='solid',
font=('Verdana',12))
headerframe.pack()
titleframe.pack()
title_label.pack()
close_button.pack()
titleframe.place(y=26, relx=0.5, anchor=CENTER)
close_button.place(x=410, y=10)
# close window
def close_win():
root.destroy()
close_button['command'] = close_win
# ----------- END HEADER ------------- #
mainframe = tk.Frame(root, width=w, height=h)
# ----------- Login Page ------------- #
loginframe = tk.Frame(mainframe, width=w, height=h)
login_contentframe = tk.Frame(loginframe, padx=30, pady=100,
highlightbackgroun='yellow', highlightcolor='yellow',
highlightthickness=2, bg=bgcolor)
username_label = tk.Label(login_contentframe, text='Username:',
font=('Verdana',16), bg=bgcolor)
password_label = tk.Label(login_contentframe, text='Password:',
font=('Verdana',16), bg=bgcolor)
username_entry = tk.Entry(login_contentframe, font=('Verdana',16))
password_entry = tk.Entry(login_contentframe, font=('Verdana',16), show='*')
login_button = tk.Button(login_contentframe,text="Login", font=('Verdana',16),
bg='#2980b9',fg='#fff', padx=25, pady=10, width=25)
go_register_label = tk.Label(login_contentframe,
text=">> don't have an account? create one" ,
font=('Verdana',10), bg=bgcolor, fg='red')
mainframe.pack(fill='both', expand=1)
loginframe.pack(fill='both', expand=1)
login_contentframe.pack(fill='both', expand=1)
username_label.grid(row=0, column=0, pady=10)
username_entry.grid(row=0, column=1)
password_label.grid(row=1, column=0, pady=10)
password_entry.grid(row=1, column=1)
login_button.grid(row=2, column=0, columnspan=2, pady=40)
go_register_label.grid(row=3, column=0, columnspan=2, pady=20)
# create a function to display the register frame
def go_to_register():
loginframe.forget()
registerframe.pack(fill="both", expand=1)
title_label['text'] = 'Register'
title_label['bg'] = '#27ae60'
go_register_label.bind("<Button-1>", lambda page: go_to_register())
# create a function to make the user login
def login():
username = username_entry.get().strip()
password = password_entry.get().strip()
vals = (username, password,)
select_query = "SELECT * FROM `users` WHERE `username` = %s and `password` = %s"
c.execute(select_query, vals)
user = c.fetchone()
if user is not None:
#messagebox.showinfo('Test','Test')
mainformwindow = tk.Toplevel()
app = mainform(mainformwindow)
root.withdraw() # hide the root
mainformwindow.protocol("WM_DELETE_WINDOW", close_win) # close the app
else:
messagebox.showwarning('Error','wrong username or password')
login_button['command'] = login
# ----------- Register Page ------------- #
registerframe = tk.Frame(mainframe, width=w, height=h)
register_contentframe = tk.Frame(registerframe, padx=15, pady=15,
highlightbackgroun='yellow', highlightcolor='yellow',
highlightthickness=2, bg=bgcolor)
fullname_label_rg = tk.Label(register_contentframe, text='Fullname:',
font=('Verdana',14), bg=bgcolor)
username_label_rg = tk.Label(register_contentframe, text='Username:',
font=('Verdana',14), bg=bgcolor)
password_label_rg = tk.Label(register_contentframe, text='Password:',
font=('Verdana',14), bg=bgcolor)
confirmpass_label_rg = tk.Label(register_contentframe, text='Re-Password:',
font=('Verdana',14), bg=bgcolor)
phone_label_rg = tk.Label(register_contentframe, text='Phone:',
font=('Verdana',14), bg=bgcolor)
gender_label_rg = tk.Label(register_contentframe, text='Gender:',
font=('Verdana',14), bg=bgcolor)
image_label_rg = tk.Label(register_contentframe, text='Profile Pic:',
font=('Verdana',14), bg=bgcolor)
fullname_entry_rg = tk.Entry(register_contentframe, font=('Verdana',14), width=22)
username_entry_rg = tk.Entry(register_contentframe, font=('Verdana',14), width=22)
password_entry_rg = tk.Entry(register_contentframe, font=('Verdana',14), width=22,
show='*')
confirmpass_entry_rg = tk.Entry(register_contentframe, font=('Verdana',14), width=22,
show='*')
phone_entry_rg = tk.Entry(register_contentframe, font=('Verdana',14), width=22)
radiosframe = tk.Frame(register_contentframe)
gender = StringVar()
gender.set('Male')
male_radiobutton = tk.Radiobutton(radiosframe, text='Male', font=('Verdana',14),
bg=bgcolor, variable=gender, value='Male')
female_radiobutton = tk.Radiobutton(radiosframe, text='Female', font=('Verdana',14),
bg=bgcolor, variable=gender, value='Female')
selectimage_frame = tk.Frame(register_contentframe, bg=bgcolor)
selectimage_button = tk.Button(selectimage_frame, text='select image', bg='#fff')
imagepath_label_rg = tk.Label(selectimage_frame, text='image path...', bg=bgcolor,
width=22)
register_button = tk.Button(register_contentframe,text="Register", font=('Verdana',16)
, bg='#2980b9',fg='#fff', padx=25, pady=10, width=25)
go_login_label = tk.Label(register_contentframe,
text=">> already have an account? sign in" ,
font=('Verdana',10), bg=bgcolor, fg='red')
#mainframe.pack(fill='both', expand=1)
#registerframe.pack(fill='both', expand=1)
register_contentframe.pack(fill='both', expand=1)
fullname_label_rg.grid(row=0, column=0, pady=5, sticky='e')
fullname_entry_rg.grid(row=0, column=1)
username_label_rg.grid(row=1, column=0, pady=5, sticky='e')
username_entry_rg.grid(row=1, column=1)
password_label_rg.grid(row=2, column=0, pady=5, sticky='e')
password_entry_rg.grid(row=2, column=1)
confirmpass_label_rg.grid(row=3, column=0, pady=5, sticky='e')
confirmpass_entry_rg.grid(row=3, column=1)
phone_label_rg.grid(row=4, column=0, pady=5, sticky='e')
phone_entry_rg.grid(row=4, column=1)
gender_label_rg.grid(row=5, column=0, pady=5, sticky='e')
radiosframe.grid(row=5, column=1)
male_radiobutton.grid(row=0, column=0)
female_radiobutton.grid(row=0, column=1)
image_label_rg.grid(row=6, column=0, pady=5, sticky='e')
selectimage_frame.grid(row=6, column=1)
selectimage_button.grid(row=0, column=0, padx=10, pady=10)
imagepath_label_rg.grid(row=0, column=1)
register_button.grid(row=7, column=0, columnspan=2, pady=20)
go_login_label.grid(row=8, column=0, columnspan=2, pady=10)
# create a function to select image
def select_image():
filename = filedialog.askopenfilename(initialdir='/images',
title="Select Profile Picture",
filetypes=(("png images","*.png"),("jpg images","*.jpg")))
imagepath_label_rg['text'] = filename
selectimage_button['command'] = select_image
# --------------------------------------- #
# create a function to display the login frame
def go_to_login():
registerframe.forget()
loginframe.pack(fill="both", expand=1)
title_label['text'] = 'Login'
title_label['bg'] = '#2980b9'
go_login_label.bind("<Button-1>", lambda page: go_to_login())
# --------------------------------------- #
# create a function to check if the username already exists
def check_username(username):
username = username_entry_rg.get().strip()
vals = (username,)
select_query = "SELECT * FROM `users` WHERE `username` = %s"
c.execute(select_query, vals)
user = c.fetchone()
if user is not None:
return True
else:
return False
# --------------------------------------- #
# create a function to register a new user
def register():
fullname = fullname_entry_rg.get().strip() # remove white space
username = username_entry_rg.get().strip()
password = password_entry_rg.get().strip()
confirm_password = confirmpass_entry_rg.get().strip()
phone = phone_entry_rg.get().strip()
gdr = gender.get()
imgpath = imagepath_label_rg['text']
if len(fullname) > 0 and len(username) > 0 and len(password) > 0
and len(phone) > 0:
if check_username(username) == False:
if password == confirm_password:
vals = (fullname, username, password, phone, gdr, imgpath)
insert_query = "INSERT INTO `users`(`fullname`, `username`, `password`
, `phone`, `gender`, `image_path`) VALUES
(%s,%s,%s,%s,%s,%s)"
c.execute(insert_query, vals)
connection.commit()
messagebox.showinfo('Register','your account has been created
successfully')
else:
messagebox.showwarning('Password','incorrect password confirmation')
else:
messagebox.showwarning('Duplicate Username','This Username Already Exists,
try another one')
else:
messagebox.showwarning('Empty Fields','make sure to enter all the information')
register_button['command'] = register
# --------------------------------------- #
# ------------------------------------------------------------------------ #
root.mainloop()
# main form
import tkinter as tk
from tkinter import *
w = 1200
h = 650
class mainform:
def __init__(self, master):
self.master = master
# ----------- CENTER FORM ------------- #
ws = self.master.winfo_screenwidth()
hs = self.master.winfo_screenheight()
x = (ws-w)/2
y = (hs-h)/2
self.master.geometry("%dx%d+%d+%d" % (w, h, x, y))
# ----------- MENU ------------- #
self.frame = tk.Frame(self.master)
self.menubar = Menu(self.frame)
self.products = Menu(self.menubar)
self.products.add_command(label="Add")
self.products.add_command(label="Edit")
self.products.add_command(label="Remove")
self.menubar.add_cascade(menu=self.products, label="Product")
self.categories = Menu(self.menubar)
self.categories.add_command(label="Add")
self.categories.add_command(label="Edit")
self.categories.add_command(label="Remove")
self.menubar.add_cascade(menu=self.categories, label="Category")
self.frame.pack()
# ------------------------------ #
self.master.config(menu=self.menubar, bg="#ecf0f1")
self.lbl = tk.Label(self.master, text='Main Form', font=('verdana',50, 'bold')
, fg='#2A2C2B',bg="#ecf0f1")
self.lbl.place(rely=0.5, relx=0.5, anchor=CENTER)
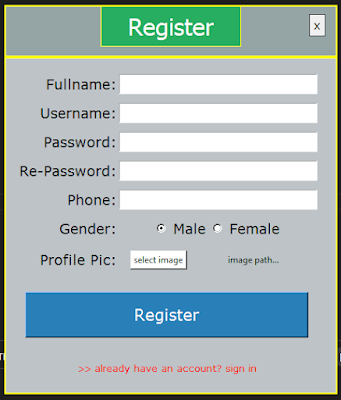
The Final Result:
 | |
|
 | |
|
 | |
|
 |
| the main form / dashboard |

